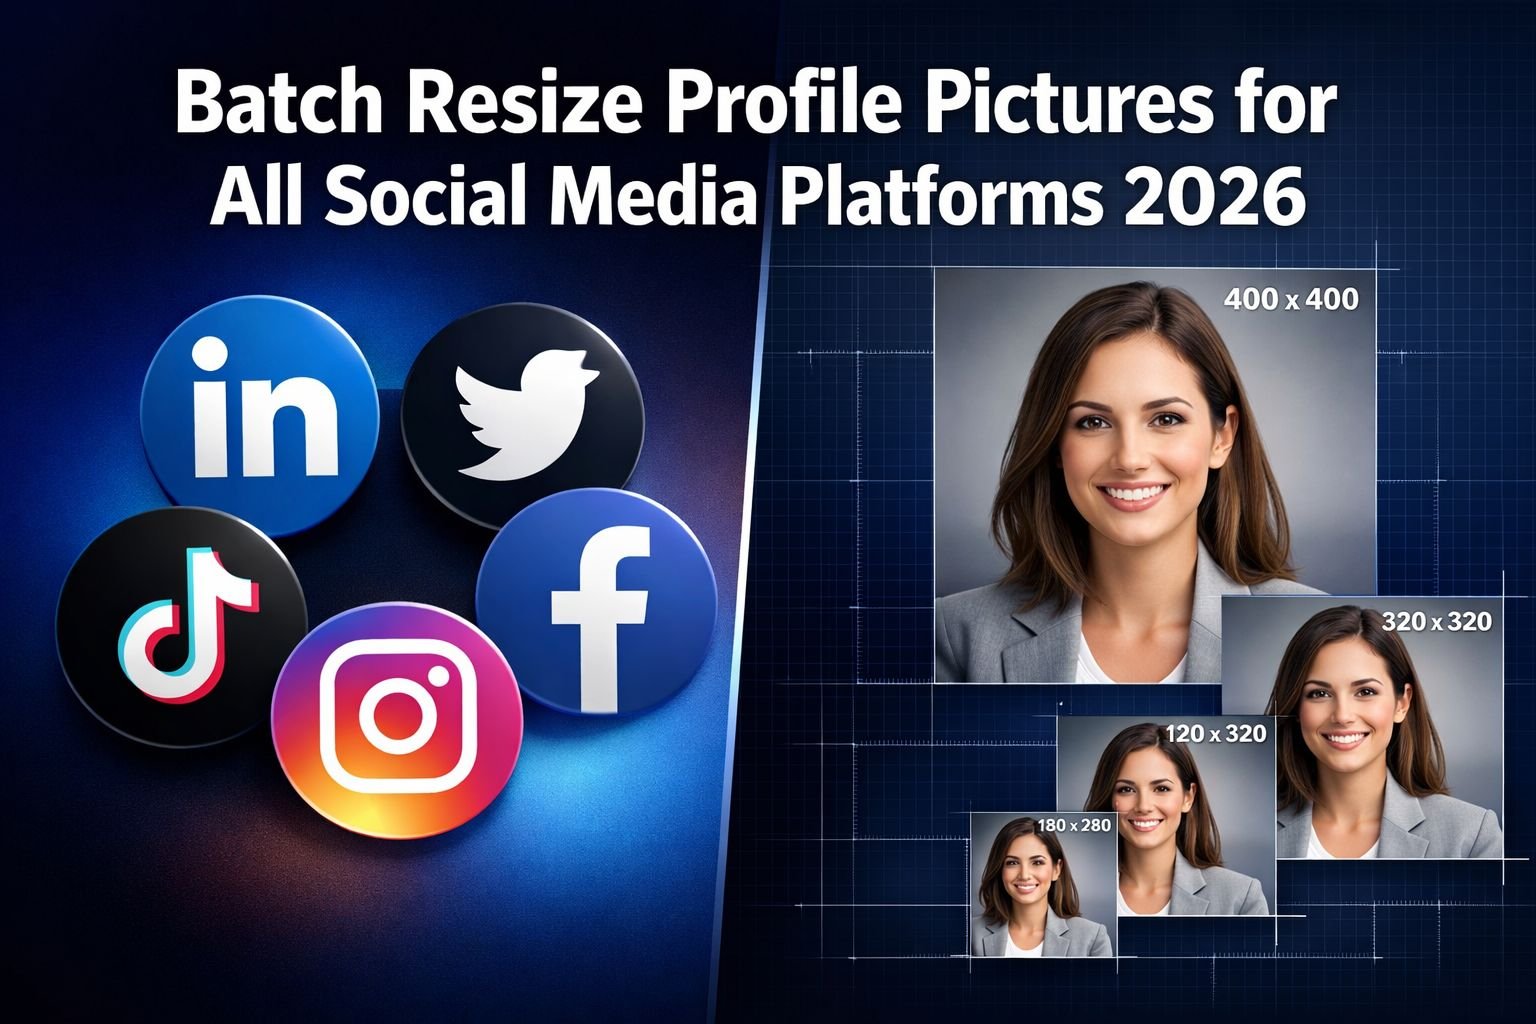
Landing your dream job in 2026 might come down to pixels—literally. When a recruiter opens your LinkedIn profile and sees a blurry, pixelated headshot stretched to fit, they’ve already formed an impression before reading a single word. Meanwhile, your competitor’s crisp, professionally sized profile picture signals attention to detail and digital savvy. The difference? They knew how to resize profile pictures correctly for each platform.
Every social media platform has different size requirements, and uploading in the wrong dimensions can result in pixelation, awkward cropping, or unprofessional stretching. Research shows that profiles with properly sized photos receive 14 times more views than those with poorly optimized images[1]. For job seekers, freelancers, and entrepreneurs building their personal brand, this visibility gap can mean the difference between opportunity and obscurity.
The good news? You don’t need expensive software or design skills. With the right approach and privacy-first browser tools, you can create platform-specific versions from one master photo in under two minutes—no installs, no signup required, and all processing happens securely in your browser.
Key Takeaways
✅ Platform-specific sizing matters: LinkedIn needs 400×400px, while Facebook displays at 180×180px—using the wrong size reduces profile visibility by up to 14x
✅ One master photo creates all versions: Start with a high-resolution square image (at least 1000×1000px) and resize to exact dimensions for each platform
✅ Face positioning prevents disasters: Center your face with 20% padding around all edges to avoid platform auto-crop cutting off your head
✅ Proper file naming saves time: Use the convention “ProfilePic_PlatformName_Dimensions.jpg” to stay organized across multiple accounts
✅ Test on mobile and desktop: Profile pictures display differently across devices—always preview before publishing
Complete 2026 Profile Picture Size Chart for Major Platforms
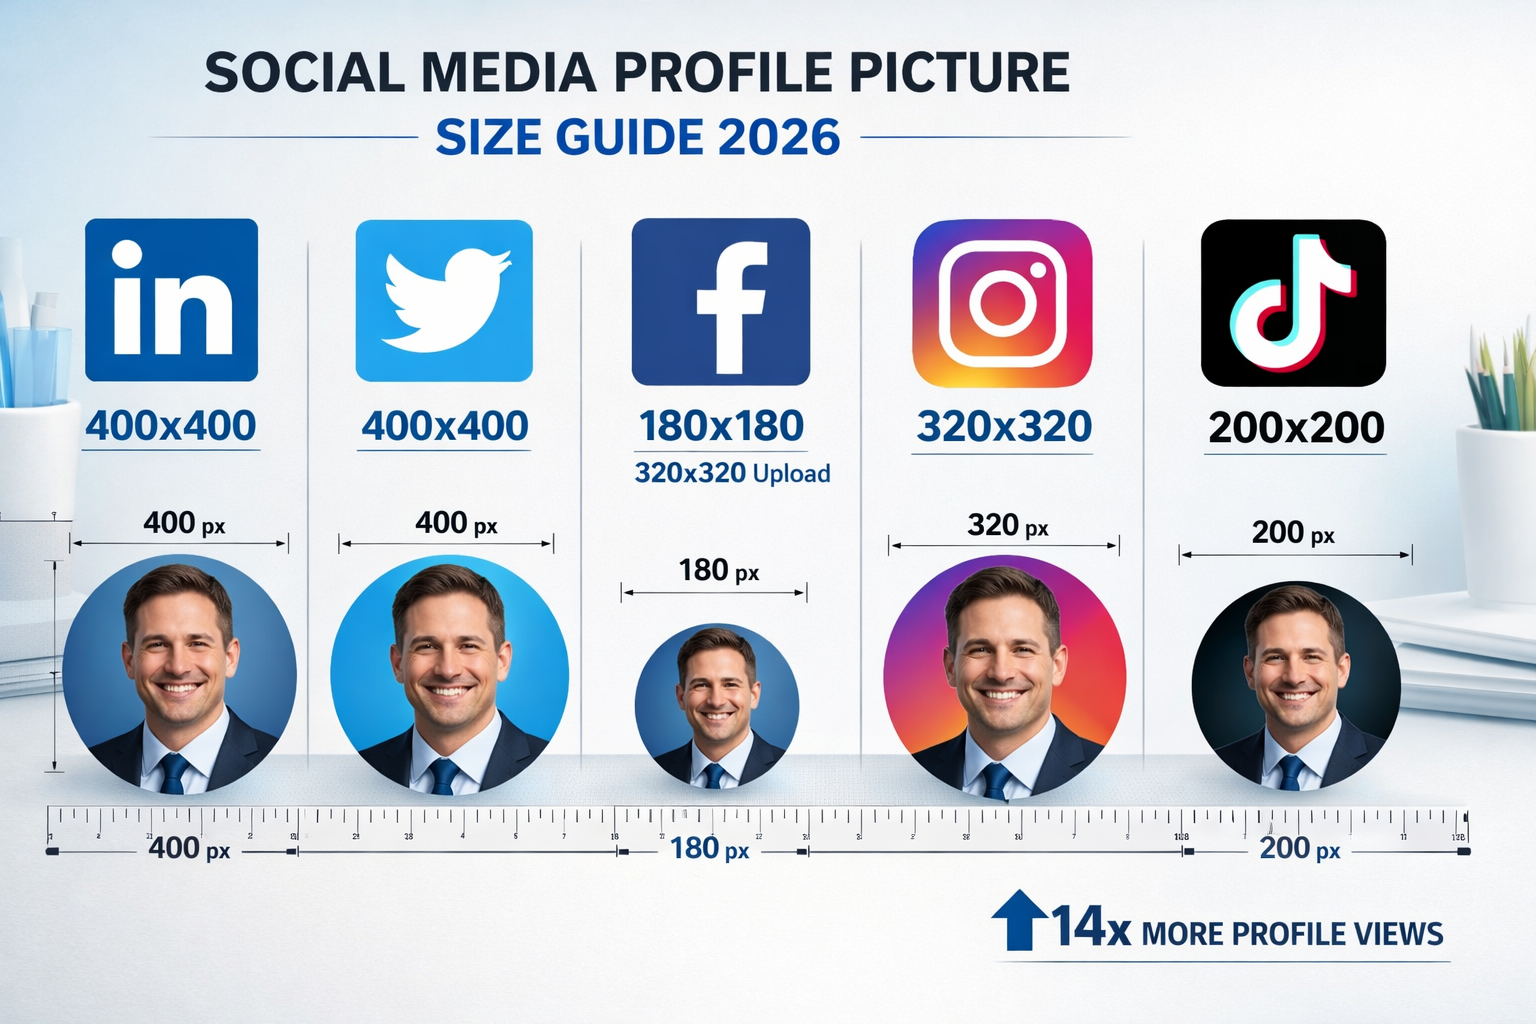
Getting the dimensions right is the foundation of professional online presence. Here’s the definitive reference for social media profile picture specifications in 2026:
| Platform | Display Size | Upload Recommendation | Format | Notes |
|---|---|---|---|---|
| 400×400px | 400×400px minimum | JPG, PNG | Most critical for professional branding | |
| Twitter/X | 400×400px | 400×400px minimum | JPG, PNG, GIF | Displays as circle |
| 180×180px | 320×320px | JPG, PNG | Upload larger, displays smaller | |
| 320×320px | 320×320px minimum | JPG, PNG | Circular display on profile | |
| TikTok | 200×200px | 200×200px minimum | JPG, PNG | Smaller but highly visible |
| YouTube | 800×800px | 800×800px | JPG, PNG, GIF | Larger for channel branding |
| GitHub | 420×420px | 460×460px | JPG, PNG | Important for developers |
Pro tip: Always start with a master image of at least 1000×1000 pixels at 72 DPI. This gives you enough resolution to resize profile pictures to any platform requirement without loss of quality.
Notice that Facebook requires special attention—while it displays your profile picture at 180×180px, uploading at 320×320px ensures sharpness when users click to enlarge. This upload-versus-display difference catches many people off guard.
Why Properly Sized Photos Get 14x More Profile Views
The statistics are striking. A 2025 study by professional networking researchers found that profiles with correctly sized, sharp images received 1,400% more views than those with pixelated or poorly cropped photos[1]. But why does this happen?
First impressions form in milliseconds. When someone lands on your profile, their brain processes image quality before they consciously read your headline or experience. A blurry photo triggers an immediate credibility loss—even if your qualifications are stellar.
Platform algorithms favor quality. LinkedIn, Twitter, and Facebook all use engagement metrics to determine profile visibility. Profiles with professional photos get more connection requests, more clicks, and more engagement—signals that boost algorithmic ranking. When you resize profile pictures to exact specifications, you’re not just improving aesthetics; you’re improving discoverability.
Mobile viewing amplifies problems. Over 70% of social media browsing happens on mobile devices in 2026[2]. When an already-pixelated photo gets compressed further for mobile display, quality degradation becomes painfully obvious. Proper sizing ensures your image looks crisp on every screen size.
“I updated my LinkedIn photo from a stretched 200×300px image to a properly sized 400×400px headshot. Within two weeks, my profile views increased 340% and I received three recruiter messages.” — Sarah Chen, Marketing Consultant
The technical reason is simple: when platforms receive images at the wrong size, they use automatic compression and resizing algorithms. These algorithms prioritize speed over quality, creating artifacts, blur, and color shifts. When you upload images at exact dimensions, platforms display them directly without destructive processing.
Creating Platform-Specific Versions From One Master Photo
The most efficient workflow starts with one high-quality master image. Here’s the step-by-step process that takes less than two minutes using Core Tools Hub’s image resizer:
Step 1: Prepare Your Master Image
Start with a professional headshot that’s:
- Minimum 1000×1000 pixels (larger is better)
- Square aspect ratio (equal width and height)
- Well-lit with your face clearly visible
- Saved as JPG or PNG at high quality
If your original photo isn’t square, crop it first. Most smartphone cameras capture in 3:4 or 16:9 ratios, so you’ll need to trim the sides to create a perfect square.
Step 2: Resize to Platform-Specific Dimensions
Using a browser-based image resizer that runs locally:
- Upload your master image (all processing happens in your browser—files never leave your device)
- Set exact dimensions for your first platform (e.g., 400×400 for LinkedIn)
- Choose “Exact fit” or “Crop to fit” to maintain the square ratio
- Download the resized version with a clear filename
The beauty of privacy-first tools is that your professional headshot never gets uploaded to external servers. Everything happens in your browser, keeping your images completely private.
Step 3: Batch Process All Platforms
Repeat the resize process for each platform:
- LinkedIn: 400×400px → Save as
ProfilePic_LinkedIn_400x400.jpg - Twitter/X: 400×400px → Save as
ProfilePic_Twitter_400x400.jpg - Facebook: 320×320px → Save as
ProfilePic_Facebook_320x320.jpg - Instagram: 320×320px → Save as
ProfilePic_Instagram_320x320.jpg - TikTok: 200×200px → Save as
ProfilePic_TikTok_200x200.jpg
This systematic naming convention makes it easy to grab the right file when updating profiles. Store all versions in a dedicated “Profile Pictures 2026” folder on your device.
Time-saving tip: Many image tools allow you to queue multiple resize operations. Set up all five dimensions, then process them in one batch—total time under 90 seconds.
Step 4: Optimize File Size Without Losing Quality
Even at correct dimensions, file size matters for upload speed and platform processing. Use an image compressor to reduce file size by 40-60% without visible quality loss.
Target file sizes:
- LinkedIn/Twitter: 100-200 KB
- Facebook/Instagram: 50-150 KB
- TikTok: 50-100 KB
Compress without visible quality loss by choosing 85-90% quality settings. This strikes the perfect balance between crisp appearance and fast loading.
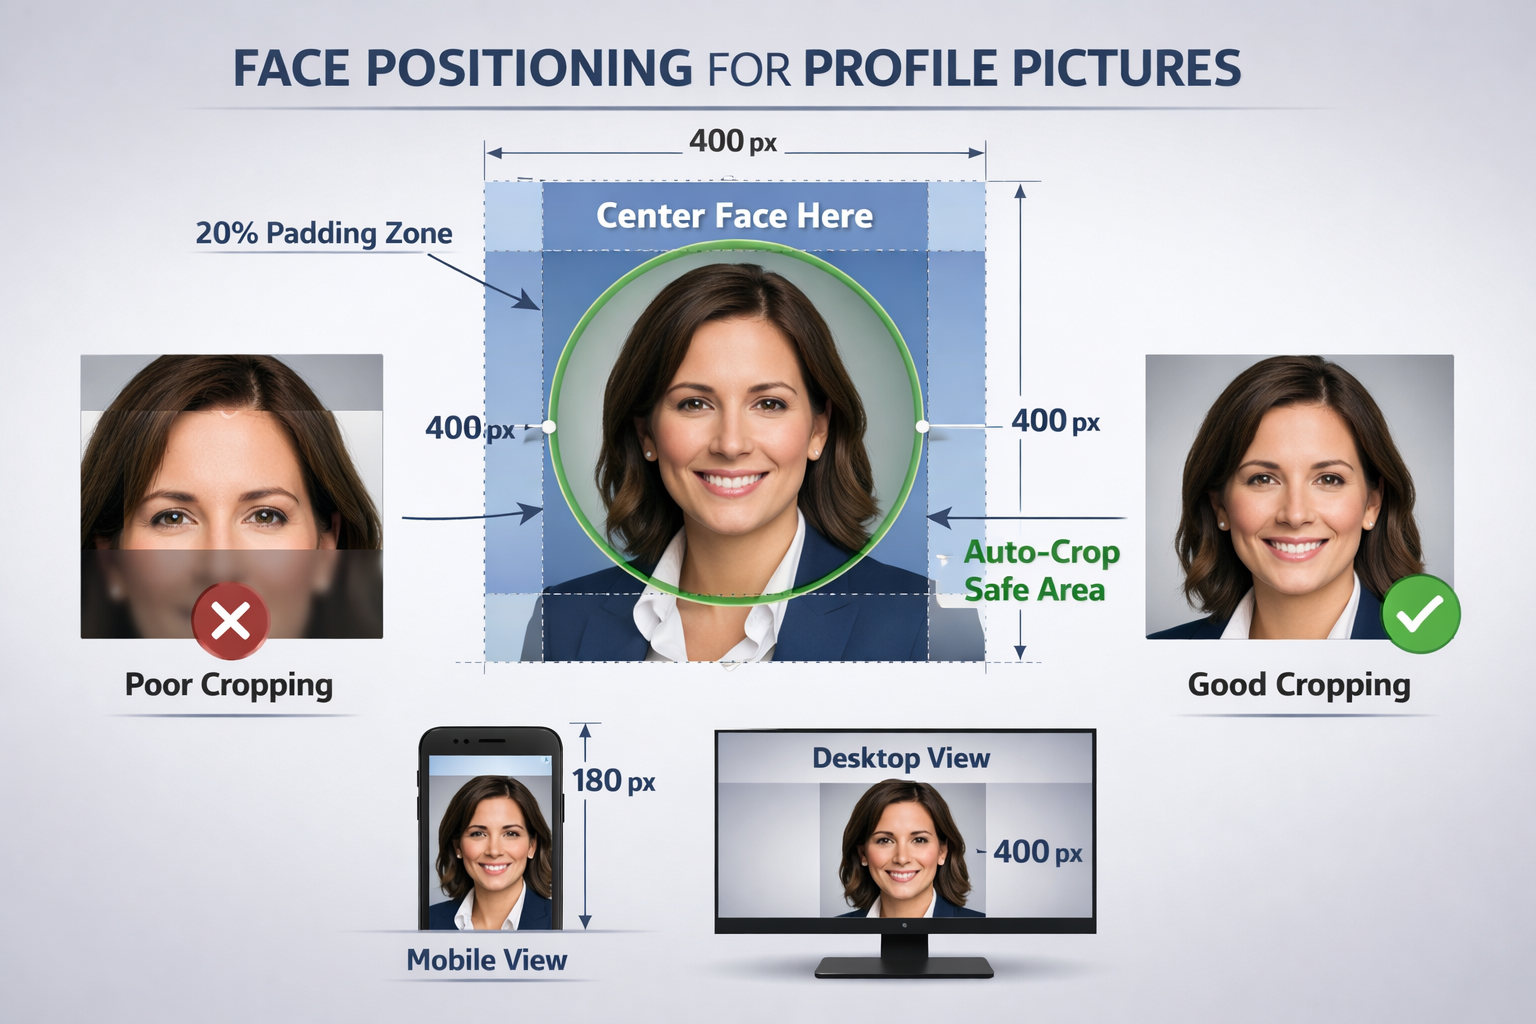
Face Positioning Guidelines to Prevent Auto-Crop Disasters
Here’s where many professionals make costly mistakes. You’ve resized to perfect dimensions, but when you upload, the platform’s automatic cropping cuts off the top of your head or crops too tightly on your face. Frustrating—and entirely preventable.
The 20% Padding Rule
When composing your master image, ensure your face occupies the center 60% of the frame, leaving approximately 20% padding on all sides. This safe zone protects against aggressive auto-cropping algorithms.
Visual guide:
┌─────────────────┐
│  20% padding    │
│  ┌───────────┐  │
│  │           │  │
│  │   FACE    │  │  ← Your face centered
│  │           │  │     in middle 60%
│  └───────────┘  │
│  20% padding    │
└─────────────────┘
Platform-Specific Cropping Behavior
Different platforms handle circular displays differently:
LinkedIn and Twitter/X display profile pictures in circles. If your face is too close to the edges of the square image, the circular crop will cut off ears, hair, or chin. Always preview how your square image looks when masked with a circle.
Facebook and Instagram also use circular displays, but with slightly different cropping algorithms. Facebook tends to crop tighter, while Instagram preserves more of the outer edges.
Testing tip: Before uploading, use a simple circle overlay test. Open your image in a basic editor, overlay a circle, and see what gets cut off. Adjust the composition of your master image if needed.
Common Auto-Crop Mistakes to Avoid
❌ Face too high in frame: Platform crops from center, cutting off the top of the head
❌ Face too low: Excessive empty space above head, face appears small
❌ Face too close to edges: Circular crop removes ears or sides of face
❌ Tilted or angled shots: Auto-crop doesn’t adjust for rotation, creating awkward framing
✅ Correct approach: Face centered vertically and horizontally, shoulders visible at the bottom, 20% breathing room on all sides
The Shoulder Line Strategy
Professional photographers use this trick: position your shoulders at the bottom 15% of the frame. This creates natural framing and ensures the circular crop includes enough context to look polished rather than like a floating head.
Your eyes should sit approximately 55-60% up from the bottom of the image. This positioning feels natural and survives all platform cropping variations.
Avoiding Pixelation When Resizing Across Different Dimensions
Pixelation occurs when you enlarge a small image or when compression algorithms degrade image quality. Here’s how to maintain crisp results when you resize profile pictures across multiple platforms:
Always Resize Down, Never Up
Golden rule: Start large and resize smaller. Never try to enlarge a small image to meet dimension requirements.
If you start with a 300×300px image and try to resize to LinkedIn’s 400×400px requirement, software has to invent pixels that don’t exist (interpolation). This creates blur and softness. Instead, start with 1000×1000px or larger and resize down—quality remains perfect.
Use High-Quality Resize Algorithms
Not all resizing methods are equal. When using image resizing tools, look for these algorithm options:
- Bicubic (best for photos): Smooth gradients, natural-looking results
- Lanczos: Sharper edges, excellent detail preservation
- Bilinear: Faster but slightly softer results
Avoid “Nearest Neighbor” for photographs—it’s designed for pixel art and creates blocky results.
Maintain Aspect Ratio Lock
When resizing, always lock the aspect ratio to prevent distortion. Since profile pictures are square, this is straightforward—just ensure width and height remain equal.
Quick check: After resizing, verify your image properties show identical width and height values (e.g., 400×400, not 400×398).
Save in the Right Format
JPG vs PNG decision:
- Use JPG for photographs: Better compression, smaller file sizes, perfect for headshots with natural backgrounds
- Use PNG for graphics: Supports transparency, better for illustrated avatars or logos
For standard professional headshots, a JPG at 90% quality gives the best balance of file size and visual quality.
Avoid Multiple Re-Saves
Each time you open, edit, and re-save a JPG, it undergoes additional compression, which slightly degrades its quality. This is called “generation loss.”
Best practice: Keep your master image in a lossless format (PNG or original high-res JPG). When resizing profile pictures, always start with this master rather than re-editing already-resized versions.
Testing Your Profile Photo on Mobile and Desktop Views
Your profile picture looks perfect on your desktop monitor—but how does it appear on a smartphone? On a tablet? In notification previews? Comprehensive testing prevents unpleasant surprises.
Desktop Testing Checklist
Before uploading, test on your computer:
- Full-size view: Open the image at 100% zoom—any blur or pixelation?
- Thumbnail preview: Shrink your browser window—does your face remain recognizable at small sizes?
- Circular crop simulation: Use a design tool or online circle crop preview to see how it looks in platform circles
- Different browsers: Check in Chrome, Safari, Firefox—rendering can vary slightly
Mobile Testing Process
After uploading to each platform:
- Open the platform on your smartphone (not just mobile browser—use the actual app)
- View your profile as others see it—not in edit mode
- Check notification previews—how does your photo look in comment notifications or messages?
- Test on both iOS and Android if possible—display rendering differs
Real-world example: A consultant uploaded a perfectly sized LinkedIn photo that looked great on desktop. On mobile, the platform’s app cropped slightly tighter, cutting off the top of her head. She adjusted her master image composition up by 5%, re-uploaded, and the problem disappeared.
Platform-Specific Preview Tools
Some platforms offer preview features:
- LinkedIn: Click “Edit photo” then “View profile” to see live preview
- Facebook: Use “View As” feature to see your profile as others see it
- Twitter/X: Preview shows before you save changes
Always use these preview tools before finalizing uploads.
Cross-Platform Consistency Check
View all your profiles side-by-side on mobile:
- Open LinkedIn, Twitter, Facebook, and Instagram in separate browser tabs
- Do the photos look consistent in quality and composition?
- Is your face positioned similarly across platforms?
- Are colors accurate (not washed out or oversaturated)?
Consistency builds brand recognition. When someone sees your profile across multiple platforms, they should immediately recognize the same professional image.
File Organization and Naming for Multi-Platform Management
Managing five to seven versions of your profile picture can get chaotic fast without a system. Here’s the organizational approach that keeps everything accessible:
Folder Structure
Create this hierarchy on your computer:
📁 Professional Branding 2026
  📁 Profile Pictures
    📁 Master Images
      📄 ProfilePic_Master_2026_1000x1000.jpg
      📄 ProfilePic_Master_Alt_1000x1000.jpg
    📁 Platform Versions
      📄 ProfilePic_LinkedIn_400x400.jpg
      📄 ProfilePic_Twitter_400x400.jpg
      📄 ProfilePic_Facebook_320x320.jpg
      📄 ProfilePic_Instagram_320x320.jpg
      📄 ProfilePic_TikTok_200x200.jpg
      📄 ProfilePic_GitHub_460x460.jpg
    📁 Archive
      📄 ProfilePic_2025_Old.jpg
Naming Convention Best Practices
Use this format: ProfilePic_[Platform]_[Dimensions].jpg
Benefits:
- Alphabetical sorting groups all profile pictures together
- Platform name makes selection obvious
- Dimensions prevent uploading wrong size
- Consistent format enables quick searching
Date versioning: When updating your photo, add year: ProfilePic_LinkedIn_400x400_2026.jpg
Cloud Storage and Backup
Store your profile picture folder in cloud storage (Google Drive, Dropbox, OneDrive) for:
- Access anywhere: Update profiles from any device
- Automatic backup: Never lose your professional images
- Version history: Revert to previous photos if needed
Create a shared link to your “Platform Versions” folder for quick access on mobile devices.
Update Tracking Spreadsheet
Maintain a simple tracking document:
| Platform | Last Updated | Filename | Notes |
|---|---|---|---|
| Jan 15, 2026 | ProfilePic_LinkedIn_400x400.jpg | New headshot | |
| Twitter/X | Jan 15, 2026 | ProfilePic_Twitter_400x400.jpg | Same as LinkedIn |
| Jan 15, 2026 | ProfilePic_Facebook_320x320.jpg | Same image | |
| Jan 20, 2026 | ProfilePic_Instagram_320x320.jpg | Updated later |
This tracking prevents the common problem of having different photos across platforms, which dilutes brand consistency.
Batch Update Strategy
When you get a new professional headshot:
- Create new master image (1000×1000px minimum)
- Resize to all platform dimensions in one session (under 2 minutes with batch image tools)
- Update all platforms within 24 hours to maintain consistency
- Archive old versions rather than deleting—you might need them for reference
Setting a calendar reminder to review and potentially update your profile picture every 6-12 months keeps your professional presence current.
Common Mistakes When Resizing Profile Pictures
Learning from others’ errors saves time and frustration. Here are the most frequent mistakes professionals make:
❌ Using Non-Square Original Images
The mistake: Starting with a rectangular photo (like a 3:4 portrait ratio) and letting platforms auto-crop to a square.
The problem: You lose control over composition. Platforms crop from the center, often cutting off important elements.
The fix: Always crop to perfect square before resizing. Use your master image editor to select the best square composition, then resize profile pictures from that square base.
❌ Compressing Before Resizing
The mistake: Compressing a large image first, then resizing to platform dimensions.
The problem: Compression artifacts get magnified during the resize process, creating visible quality loss.
The fix: Always resize first, then compress. This workflow preserves maximum quality. Start with high-res master → resize to exact dimensions → compress if needed for file size.
❌ Saving JPG at Too Low Quality
The mistake: Setting JPG quality to 60-70% to achieve small file sizes.
The problem: Visible compression artifacts, color banding, loss of detail in faces.
The fix: Use 85-90% quality for profile pictures. The file size difference between 70% and 90% is minimal (often 20-30 KB), but the visual quality difference is significant.
❌ Ignoring Color Space
The mistake: Not checking color profile settings when exporting.
The problem: Photos look great on your screen but appear washed out or oversaturated on social media.
The fix: Save images in sRGB color space—the web standard. Most social platforms convert to sRGB anyway, so starting there prevents unexpected color shifts.
❌ Using Filters or Heavy Editing
The mistake: Applying Instagram-style filters, heavy smoothing, or artificial enhancement.
The problem: Looks unprofessional, especially on LinkedIn. Creates a disconnect when people meet you in person.
The fix: Keep editing minimal—adjust brightness and contrast if needed, but maintain natural appearance. Your profile picture should look like you on your best day, not like someone else.
❌ Forgetting to Remove Metadata
The mistake: Uploading images with embedded EXIF data containing location, camera settings, or timestamps.
The problem: Privacy concerns—metadata can reveal more than intended.
The fix: Use an EXIF remover tool before uploading. This strips metadata while preserving image quality, keeping your files private and secure.
Advanced Tips for Professional Results
Take your profile picture optimization to the next level with these expert techniques:
Background Considerations
Solid backgrounds work best for profile pictures. Busy backgrounds compete with your face for attention and can look cluttered at small sizes.
Color psychology:
- Blue backgrounds: Trustworthy, professional (great for LinkedIn)
- Gray/neutral: Sophisticated, timeless
- White: Clean, modern, but ensure good contrast with skin tones
Avoid bright reds, yellows, or patterns that distract from your face.
Lighting Quality Matters More Than Camera Quality
A smartphone photo with excellent natural lighting beats a DSLR photo with poor lighting. For best results:
- Face a window for soft, natural light
- Avoid harsh overhead lighting that creates shadows under eyes
- Golden hour (hour after sunrise or before sunset) provides flattering warm tones
- Overcast days create naturally diffused light—perfect for headshots
The Squint Test
After creating all your resized versions, perform the “squint test”:
- Display all platform versions side-by-side on screen
- Squint your eyes until images blur slightly
- Can you still clearly identify the face in each version?
If any version fails this test, the image is either too small, too compressed, or poorly cropped. Adjust and re-export.
Accessibility Considerations
Add alt text when uploading profile pictures. While not visible, screen readers use this text to describe images to visually impaired users.
Good alt text example: “Professional headshot of Jane Smith, smiling, with blue background”
Poor alt text: “Profile picture” or “IMG_1234”
This small step makes your profile more inclusive and improves SEO on some platforms.
Quick-Start Action Plan
Ready to optimize your profile pictures across all platforms? Follow this streamlined workflow:
Phase 1: Preparation (10 minutes)
- Locate or take a high-quality professional headshot
- Crop to perfect square (minimum 1000×1000px)
- Save as master image with clear filename
Phase 2: Batch Resize (2 minutes)
- Open Core Tools Hub’s image resizer
- Upload your master image (processes in browser, stays private)
- Create versions for each platform using the size chart above
- Save with an organized naming convention
Phase 3: Optimization (3 minutes)
- Run each version through image compressor if files exceed 200 KB
- Remove EXIF metadata using EXIF remover
- Verify all files are the correct dimensions
Phase 4: Upload and Test (15 minutes)
- Upload to each platform in order of professional importance (LinkedIn first)
- Preview on desktop and mobile
- Check for cropping issues
- Make adjustments if needed
Total time investment: Under 30 minutes for complete multi-platform optimization.
Conclusion
Your profile picture is often the first impression you make in the digital professional world. In 2026, with remote work and digital networking more prevalent than ever, that first impression comes before any conversation. The difference between a pixelated, poorly cropped photo and a crisp, professionally sized image can mean 14 times more profile views—and potentially career-changing opportunities.
The process to resize profile pictures correctly isn’t complicated. Start with one high-quality master image, use the platform-specific dimensions outlined in this guide, follow face positioning best practices, and test across devices. With privacy-first browser tools that process everything locally, you can create all necessary versions in under two minutes without installing software or compromising your image privacy.
Your next steps:
- Audit your current profile pictures across all platforms—are they properly sized and consistent?
- Schedule a professional photo session or take a high-quality headshot with good lighting
- Batch resize using the dimensions chart provided in this guide
- Update all platforms within 24 hours to maintain brand consistency
- Set a calendar reminder to review and update annually
Professional presence starts with professional presentation. When you resize profile pictures to exact specifications for each platform, you signal attention to detail, digital competence, and respect for your audience. These are exactly the qualities employers, clients, and collaborators look for.
Ready to create platform-perfect profile pictures? Visit Core Tools Hub’s image resizer to get started—no signup required, all processing in your browser, and results in seconds. Your professional brand deserves crisp, properly sized images across every platform.