Last updated: March 27, 2026
Quick Answer
To resize images for social media without cropping, start with the correct aspect ratio for each platform, then export a separate version for each placement rather than forcing a single image to fit everywhere. Use JPEG for most photos, PNG for graphics with text or transparency, and WebP when a tool or workflow supports it, and file size is a concern. If an image is too small, add padding or use AI background expansion instead of stretching the photo, which usually looks soft or distorted.
Key Takeaways
- The fastest way to resize images for social media without cropping is to create platform-specific exports from one original file.
- Wrong aspect ratios cause most auto-cropping problems on Instagram, Facebook, and LinkedIn.
- Instagram now supports more flexible posting, including 3:4 images, which helps full phone photos fit better than before.
- Compression matters because oversized files can look worse after social platforms recompress them.
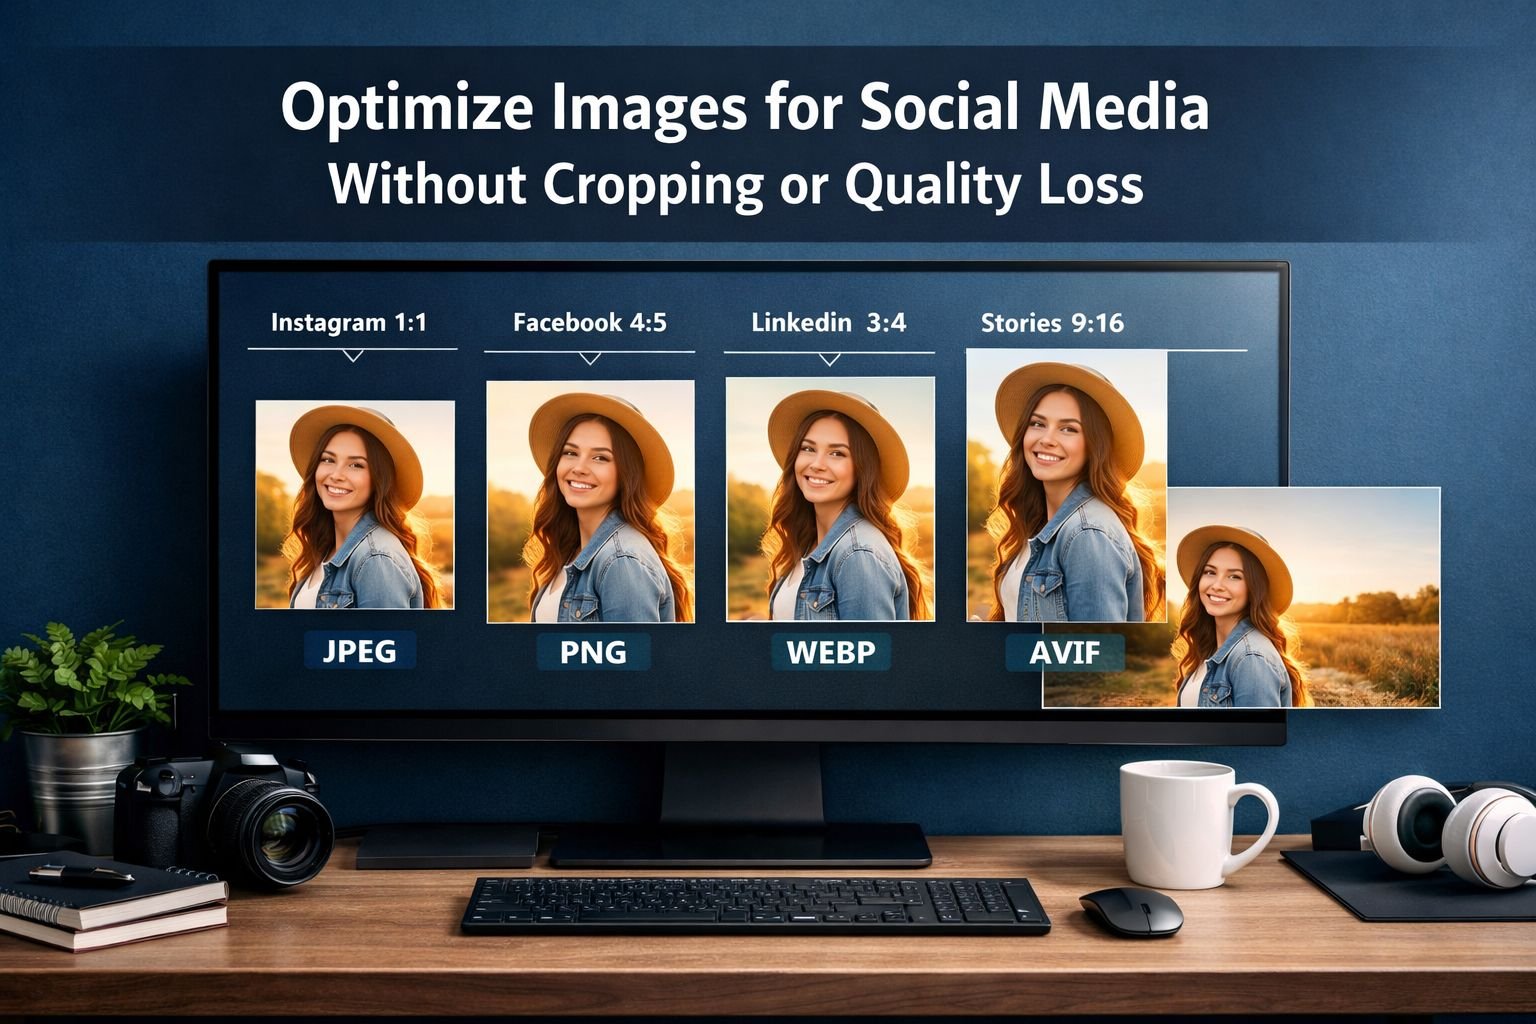
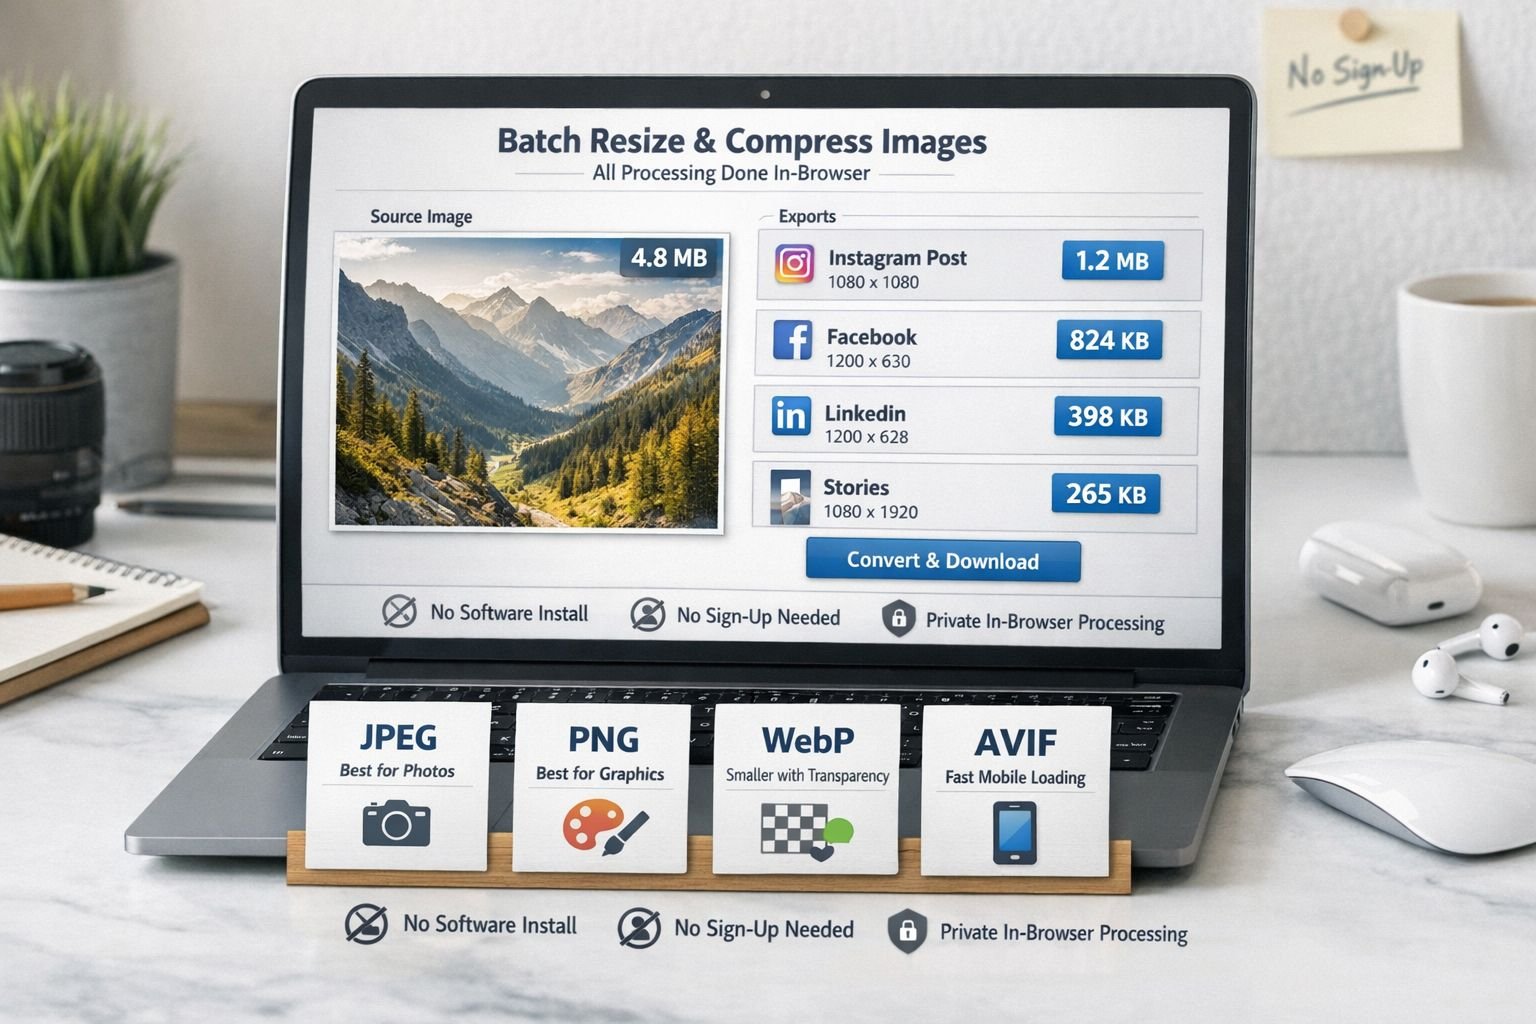
- JPEG works best for photos, PNG for graphics and transparency, and WebP/AVIF can reduce file size further before upload when supported in the workflow.
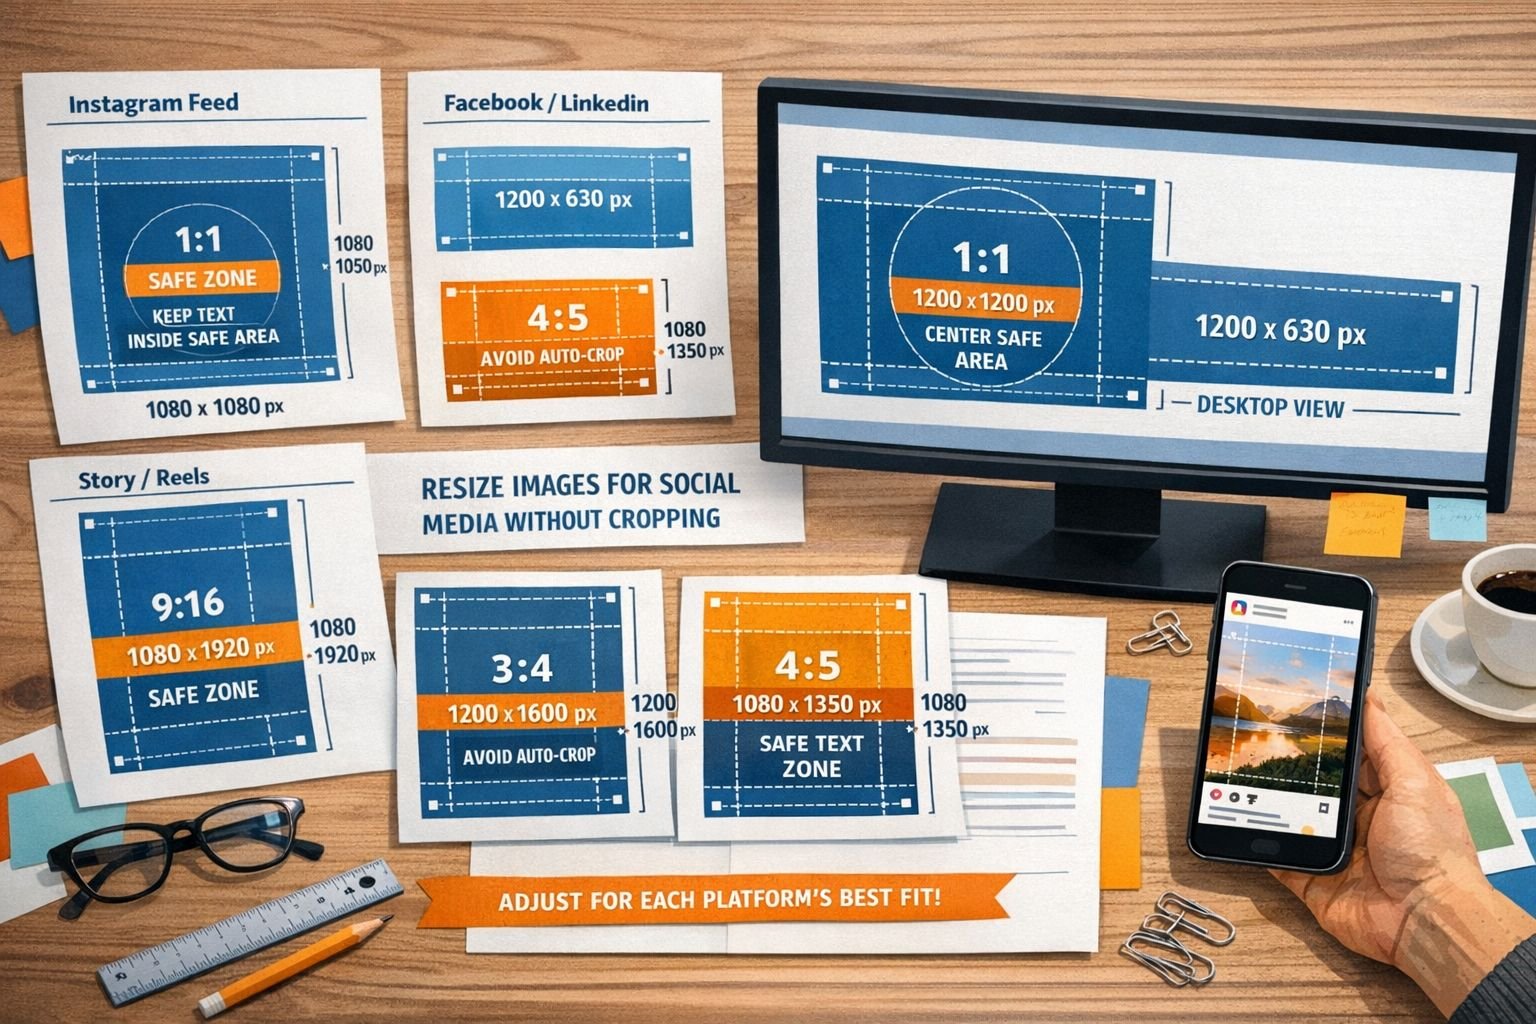
- Keep important faces, products, and text in the center-safe area, as grid previews and feed displays can vary.
- Batch resizing saves time when posting to several platforms at once.
- Browser-based tools are useful for quick fixes because they run in your browser, require no installation, and deliver fast, clean results.
- If a photo is too narrow or too wide, add a background fill rather than zooming in and cutting off the subject.
- A simple resizer plus compressor workflow usually beats exporting giant files from heavy design apps for everyday posting.
A creator spends 20 minutes perfecting a product photo, posts it to Instagram, and then sees the top of the packaging cut off in the feed. A small business owner uploads the same image to Facebook, where it looks soft and oversized. That problem is common, and the fix is simple: resize images for social media without cropping by first matching the right canvas size, then compressing carefully so the file stays sharp.
Which image sizes work best on social platforms?
The best image size depends on the platform and placement. Feed posts, stories, cover images, and profile pictures all use different aspect ratios, so one export rarely works everywhere.
Here’s a practical cheat sheet for common post types:
| Platform placement | Recommended ratio | Typical use |
|---|---|---|
| Instagram feed square | 1:1 | General posts, product shots |
| Instagram portrait | 4:5 | Taller feed posts with more screen space |
| Instagram full photo option | 3:4 | Phone photos that need less cropping |
| Stories / Reels cover | 9:16 | Vertical content |
| Facebook feed image | 1.91:1 or 1:1 | Link visuals or standard posts |
| LinkedIn feed image | 1.91:1 or 1:1 | Business posts and banners |
| X / Twitter image | 16:9 or 1:1 | Wider visuals and previews |
Decision rule:
Choose the platform’s native ratio first. If the original photo does not match, use padding or a background extension rather than forcing a crop.
A useful detail for Instagram: Kapwing reports that Instagram added support for a 3:4 aspect ratio in 2025, which matches many phone camera photos more closely and makes full-image posting easier. Hootsuite and Postfast also keep updated size references that are handy when platforms change layouts.
Why do crops still happen even when the upload looks right
A platform may show one version in the feed and another in the grid preview or thumbnail. Radaar was mentioned in the research notes, but for this guide, the safer verified point is that platform previews vary, and creators should keep key details centered. Hootsuite’s guide supports designing for display differences across placements.
Common mistake:
Placing text or logos too close to the top or bottom edge. Even if the full post uploads correctly, the preview may trim those edges.
How can you resize images for social media without cropping?
The cleanest method is to resize the canvas, not the subject. In plain terms, that means fitting the full image within the target dimensions and filling any empty space with a matching background, a blurred edge, or a solid brand color.
Simple step-by-step workflow
Start with the highest-quality original
- Use the original camera export or master design file.
- Avoid resizing an already compressed screenshot if possible.
Pick the target platform and ratio
- Example: Instagram portrait 4:5, Story 9:16, Facebook square 1:1.
Resize to exact dimensions
- Use a fast browser tool like the Image Resizer – Resize PNG/JPG/WebP Online to resize to exact dimensions with no installs.
Choose fit instead of fill
- “Fit” keeps the full image visible.
- “Fill” usually zooms and crops.
Add padding if needed
- Use white, black, blurred, or branded background space.
- This is the quickest fix for “Instagram crops my photos.”
Compress before posting
- Run the resized file through the Image Compressor – Compress PNG/JPG/WebP Online to reduce file size without visible quality loss.
Preview on mobile
- Social media is mostly seen on phones, so check the final framing there.
The easiest way to avoid unexpected cropping is to export one image per platform, not one image for every platform.
Quick example:
A bakery has one landscape cake photo. Instead of uploading that same file everywhere, the shop creates:
- Instagram feed: 4:5 with soft blurred side padding
- Facebook: 1:1 crop-safe square
- Story: 9:16 version with extra top and bottom space for text
That one change usually makes the post look more polished across channels.
For a broader workflow, see Perfect Image Dimensions: Resize for Web, Email & Social in Minutes.
Which file format should you use for social media images?
For most social posts, JPEG is the best default for photos. PNG is better for graphics, screenshots, and transparent assets, while WebP and AVIF are useful when reducing file size matters and your toolchain supports them well.
Best settings by image type
| Image type | Best format | Why |
|---|---|---|
| Portraits, product photos, event photos | JPEG | Small file size, good visual quality |
| Logos, screenshots, graphics with text | PNG | Sharp edges, supports transparency |
| Website/social workflow with smaller files | WebP | Good compression and crisp images for web |
| Future-ready export testing | AVIF | Very small files, but support and workflow checks matter |
Choose JPEG if…
- The image is a photo
- Transparency is not needed
- Fast posting matters
Choose PNG if…
- The image has text overlays or flat graphics
- The background needs transparency
- Edge sharpness matters more than file size
Choose WebP if…
- The workflow supports it
- You want smaller files than JPEG or PNG
- You’re preparing assets for web and social together
If format choice feels confusing, the article Lossless vs Lossy Formats: Balancing File Size and Image Quality explains the tradeoffs clearly. For next-gen options, see AVIF vs WebP vs JPEG.
A practical note on WebP and AVIF
Modern formats often shrink files more than older formats, which can help mobile uploads and reduce the chance of heavy platform recompression. That said, many social apps still convert uploads internally, so the biggest win is often using the correct dimensions first, then compressing sensibly before upload.
Common mistake:
Using PNG for every photo. PNG photo files are often much larger than needed and can slow uploads with no visible benefit.
How do you compress images for social media without visible quality loss?
Compression works best after resizing, not before. Once the image already matches the target dimensions, gentle compression can cut file size while keeping the post sharp enough for feeds and stories.
If the image is still huge after export, use a quality setting that reduces unnecessary data but avoids obvious blur, halos, or blocky texture. For most social posts, moderate compression is enough.
Best settings for fast clean results
- JPEG photos: start around medium-high quality, then preview
- PNG graphics: compress only if text and edges stay crisp
- WebP: use for smaller files where supported
- Avoid multiple saves: every extra export can reduce quality
For more detail, see How to Compress Images Without Quality Loss Guide and Compress Image File Size Without Losing Quality (2026).
Quick quality check before posting
Use this checklist:
- Zoom to 100%
- Check faces and eyes
- Check text edges
- Check dark gradients for banding
- Compare original vs compressed side by side
- Test on a phone screen
Edge case:
If the image contains tiny text, compression may make the text fuzzy. In that case, keep text larger in the design or switch from JPEG to PNG.
What causes blurry social media images?
Blurry posts usually come from wrong dimensions, aggressive compression, or upsizing a small image too much. In other words, the platform is often reacting to a weak source file.
The most common reasons
- Uploading a file much larger than needed, then letting the platform recompress it
- Uploading a file much smaller than needed, forcing the platform to scale it up
- Exporting screenshots instead of original files
- Re-saving the same JPEG many times
- Sharpening too aggressively before export
Decision rule:
If the original image is smaller than the target size, don’t simply stretch it. Use AI expansion or background padding if keeping the full scene matters more than filling every pixel.
Adobe Express and Kapwing both highlight AI-assisted expansion as a workaround for growing dimensions without obvious stretching. That approach is better suited to certain hero images or marketing graphics than to everyday post resizing.
Can you batch resize photos for multiple platforms at once?
Yes, and batch resizing is usually the fastest option for creators and small businesses. One source image can produce several platform-ready exports in a few clicks, saving time and keeping branding more consistent.
Soona’s reviewed workflow direction supports creating channel-specific variants from one source image rather than editing each platform by hand. That matches how most practical social teams work today.
A simple batch workflow
- Upload the original image once
- Create presets for:
- Instagram 4:5
- Instagram Story 9:16
- Facebook 1:1
- LinkedIn 1.91:1
- Export all versions
- Compress each version lightly
- Name files clearly, such as
product-instagram-4x5.jpg
Core Tools Hub is useful here because the tools are privacy-first, run in your browser, and require no signup required for quick file prep. For more options, start with Online Image Tools or read How to Resize Images Online Free 2026 | Complete Guide.
Who batch resizing is for:
- Solo creators posting to 2 or more channels
- Small businesses with weekly content calendars
- Agencies making repeat client exports
Who may need a full design app instead:
- Teams building layered campaigns
- Designers creating custom templates every day
- Users needing advanced retouching before resizing
How can you keep images private while resizing online?
If privacy matters, use tools that process files in the browser instead of sending them to a server. That approach is useful for product photos, client work, drafts, and unreleased campaigns.
Core Tools Hub is built around that style of workflow: all processing in browser, secure file handling, no installs, and works on desktop and mobile. For a closer look at the tradeoffs, see Browser-Based File Conversion vs Cloud Upload Tools.
Extra privacy step
Remove hidden metadata before posting if the image contains location or camera details. The Image EXIF Remover is a quick fix for that.
What are the most common mistakes when trying to resize images for social media without cropping?
Most failed exports come from trying to make one file do every job. Social layouts are different, so the safer method is one source file, several exact-size outputs.
Common mistakes
- Using one universal size for every platform
- Cropping manually without checking safe zones
- Exporting giant PNG photos
- Upscaling small images too much
- Ignoring mobile preview
- Leaving important text near the edges
- Compressing first, then resizing again
Quick fix list
- Resize first, compress second
- Keep subject centered
- Use the native aspect ratio
- Export separate files for feed, story, and cover
- Test before scheduling a campaign
Related reading
- Perfect Image Dimensions: Resize for Web, Email & Social in Minutes
- Resize Profile Pictures for Social Media Platforms 2026
- Free Online PDF & Image Tools — Fast, Private, In-Browser
FAQ
What is the best way to resize images for social media without cropping?
Use the target platform’s aspect ratio, choose “fit” instead of “fill,” and add padding or background space when the original shape does not match.
Why does Instagram crop photos that looked fine before posting?
Instagram may display different previews in feed and grid layouts, so edge content can get trimmed even if the full upload is accepted.
Is JPEG or PNG better for social media?
JPEG is better for most photos, while PNG is better for graphics, screenshots, and images with transparency.
Can WebP be used for social media images?
WebP can be useful in a prep workflow because it keeps file sizes low, but some social platforms may still convert uploads internally.
How do you avoid blurry images on Instagram?
Use the correct dimensions, avoid tiny source files, and compress lightly after resizing rather than uploading oversized or undersized images.
Should one image be used for every social platform?
No. Separate exports for Instagram, Facebook, LinkedIn, and Stories usually give better framing and less auto-cropping.
What if the original image is too small?
Do not stretch it heavily. Add padding, use a matching background, or try AI expansion when quality matters.
Are online image resizers safe for business use?
They can be, especially when the tool runs in the browser and does not require cloud uploads for processing.
Conclusion
To resize images for social media without cropping, the winning formula is simple: match the platform’s aspect ratio first, keep the full subject within a safe area, then compress just enough to keep the file light and clear. That approach helps creators and small businesses avoid the two problems people complain about most: unexpected crops and soft-looking uploads.
For the fastest workflow, use a single clean source image to create several platform-ready versions in minutes. Core Tools Hub makes that easy with a lightweight, privacy-first setup that runs in your browser. Start with the Image Resizer, then finish with the Image Compressor for crisp images for web and social.