
Last updated: May 27, 2026
Quick Answer: To convert PDF to JPG without quality loss, export at 150–300 DPI for web use or 300–600 DPI for print. Use a browser-based tool that lets you control resolution settings, pick your page range, and download clean JPGs — no installs, no signup required. The most common cause of blurry results is leaving DPI at the default 72, which is too low for anything beyond a tiny thumbnail.
Key Takeaways
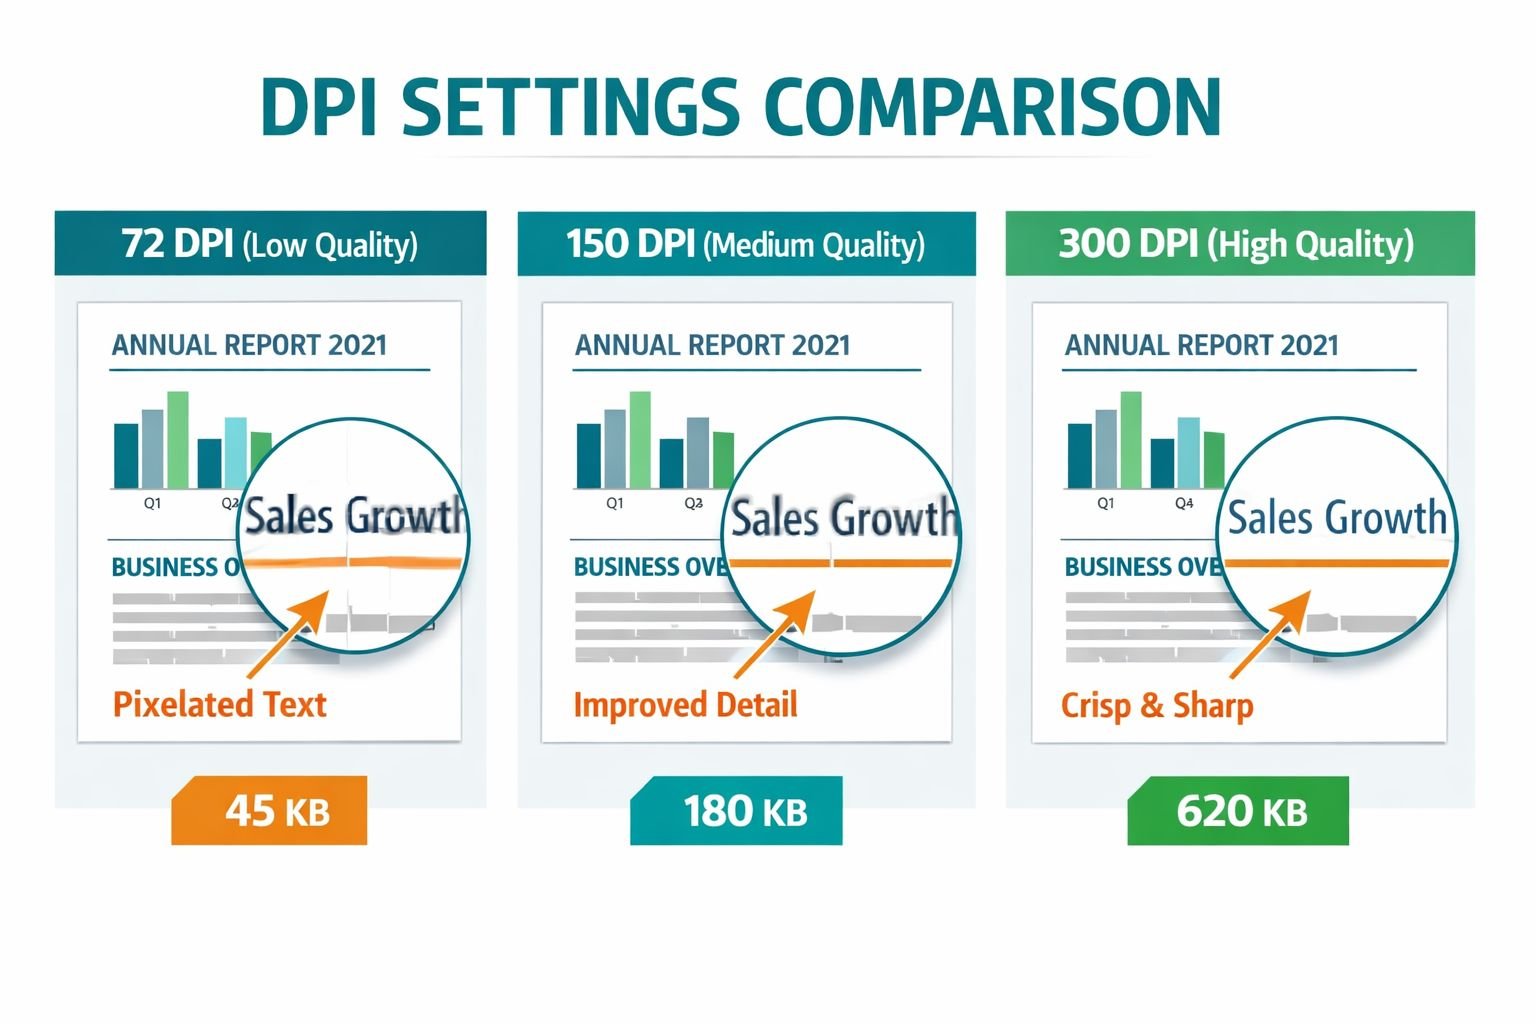
- DPI is the single biggest quality lever. 72 DPI = blurry previews; 150 DPI = solid web thumbnails; 300 DPI = sharp blog images and social posts; 600 DPI = print-ready exports.
- JPG is the right format for most PDF page exports — it keeps file sizes manageable while delivering good visual quality for photos and mixed content.
- PNG beats JPG when the PDF page has text, logos, or flat graphics — no compression artifacts, but larger files.
- WebP is the best choice for web galleries and preview tiles — roughly 25–34% smaller than equivalent JPGs at the same apparent quality, which directly helps page load times and Core Web Vitals.
- Batch conversion matters for multi-page PDFs. Choose a tool that handles all pages at once rather than exporting one by one.
- Privacy-first tools run entirely in your browser. Your PDF never leaves your device, which matters for contracts, medical records, or any sensitive document.
- The most common mistake is taking a screenshot of a PDF to get a “higher quality” image — this skips DPI control entirely and usually produces inconsistent results.
- For web use, compress your exported JPGs after conversion to cut file size by 30–60% without visible quality loss.
Why People Convert PDF to JPG (And Where It Goes Wrong)
The need to convert PDF to JPG comes up constantly: pulling a cover page for a blog post, generating social media preview images, creating gallery thumbnails from a product catalog, or extracting a single chart from a 40-page report.
The problem is that most tools default to 72 DPI — the minimum screen resolution — which produces images that look fine at a glance but fall apart the moment they’re resized, printed, or displayed on a high-density screen. Users then resort to taking screenshots of the PDF directly, which results in inconsistent margins, unpredictable resolution, and no control over the output size.
The fix is straightforward: pick a tool that exposes DPI and compression settings, then match those settings to your actual use case.
What DPI Setting Should You Use for PDF to JPG?
DPI (dots per inch) controls how much detail gets packed into each inch of the exported image. Higher DPI means sharper images and larger file sizes. The right setting depends entirely on where the image will be used.
| Use Case | Recommended DPI | Typical File Size (A4 page) |
|---|---|---|
| Small thumbnail (under 300px wide) | 72–96 DPI | 20–60 KB |
| Web preview / blog image | 150 DPI | 80–200 KB |
| Social media post | 150–200 DPI | 150–400 KB |
| High-res hero image / presentation | 300 DPI | 400 KB–1.5 MB |
| Print-ready export | 300–600 DPI | 1–5 MB |
Common mistake: Exporting at 300 DPI for a thumbnail that displays at 200px wide. This creates a file 4x larger than needed with no visible quality benefit. Match DPI to the display size, not the highest available setting.
For most web workflows, 150 DPI hits the sweet spot — sharp enough for retina screens at typical blog image sizes, small enough to load quickly.
JPG vs PNG vs WebP: Which Format for Exported PDF Pages?
JPG is the default choice for most PDF page exports because it strikes a good balance between quality and file size for photos and mixed content. But it’s not always the right pick.
- Use JPG when: the PDF page contains photos, gradients, or complex illustrations. JPG compression handles these well and keeps files lean.
- Use PNG when: the page has sharp text, logos, line art, or flat color areas. PNG is lossless, so edges stay crisp. File sizes run larger, but there are no compression artifacts.
- Use WebP when: you’re publishing to a website or building a gallery. WebP delivers similar visual quality to JPG at 25–34% smaller file sizes, which directly improves page load speed and Core Web Vitals scores.
For a deeper look at when each format makes sense, see this guide on lossless vs lossy formats and when size vs quality matters.
Decision rule: If the output is for print or offline use, JPG or PNG. If it’s going on a website, convert to WebP after exporting from PDF.
How to Convert PDF to JPG Without Losing Quality (Step-by-Step)
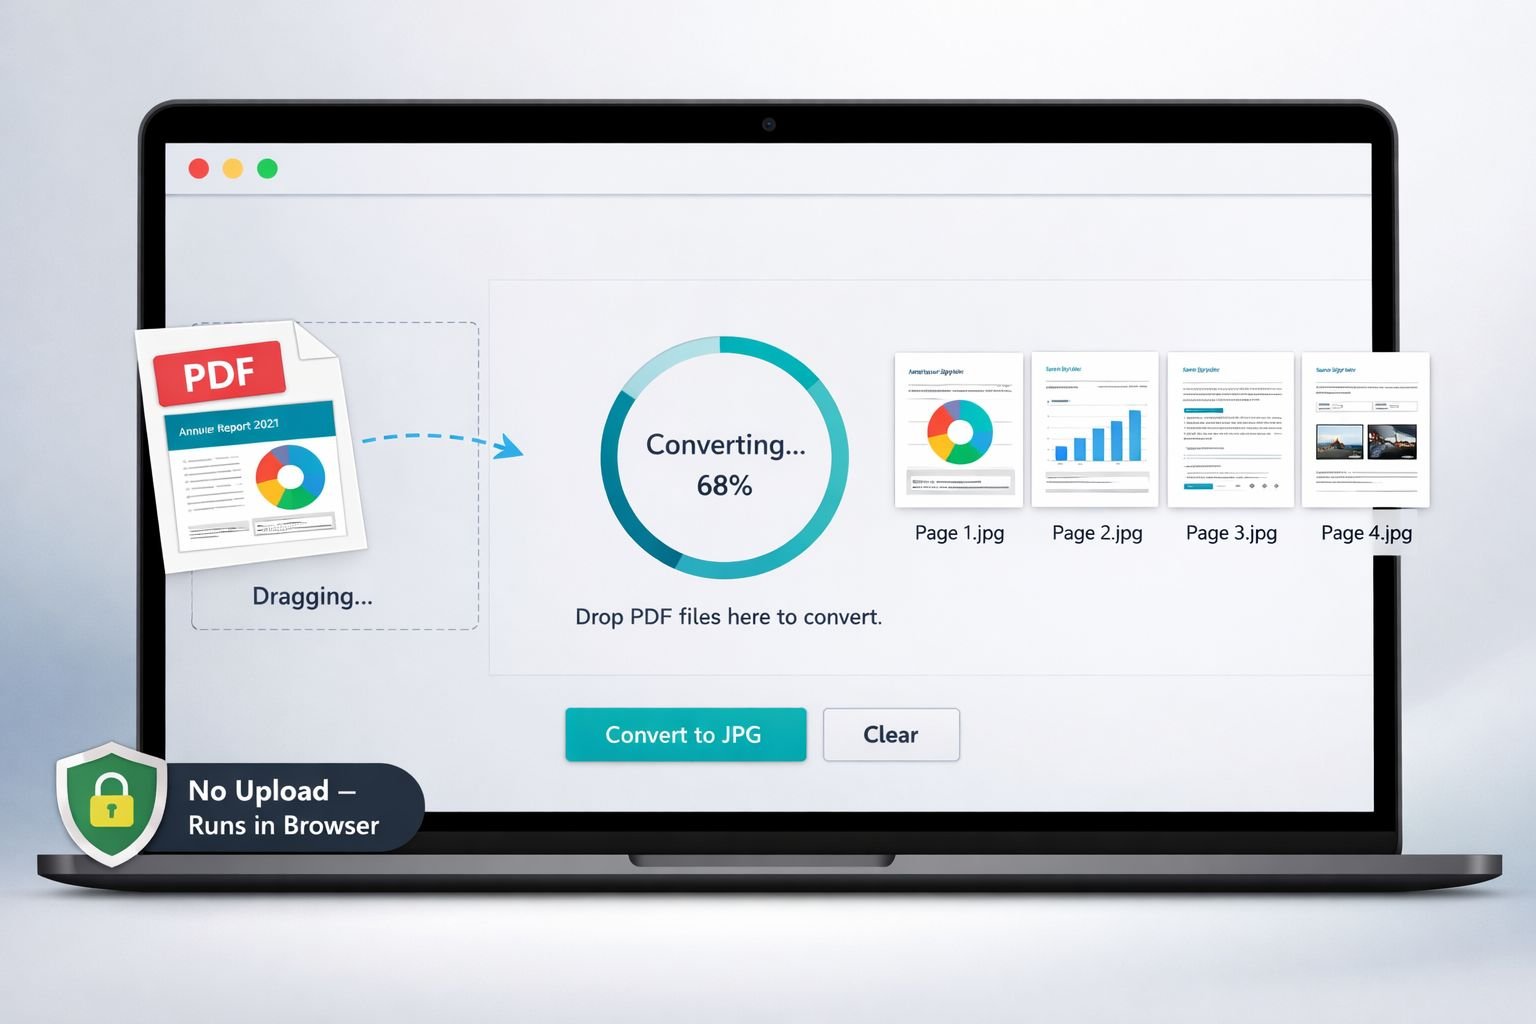
The fastest, most private way to get clean JPG images from a PDF is to use a browser-based converter that runs entirely on your device. No file uploads, no waiting for a server, no signup required.
Here’s the process using CoreToolsHub’s PDF to Images converter:
- Open the tool in your browser on desktop or mobile.
- Drop your PDF onto the upload area or click to browse.
- Select your output format — JPG, PNG, or WebP.
- Set your DPI — choose 150 for web use, 300 for presentations or print.
- Choose your page range — all pages, a single page, or a custom range (e.g., pages 3–7).
- Click Convert — processing runs in your browser, so results appear in seconds.
- Download your images — individually or as a ZIP file for multi-page exports.
All processing happens in your browser. Your PDF is never sent to a server, keeping sensitive documents private.
Quick tip: If you only need specific pages before converting, use the split PDF tool to extract just those pages first. This keeps exports clean and avoids downloading images you don’t need.
How to Handle Multi-Page and Batch PDF-to-JPG Conversions
For multi-page PDFs, the key is choosing a tool that exports all pages in one pass rather than forcing you to convert page by page. Manual one-at-a-time exports introduce inconsistencies in DPI and file naming.
A good batch workflow looks like this:
- Export all pages at a consistent DPI (150 for web, 300 for print).
- Download as a ZIP file to keep filenames organized.
- Run the exported JPGs through an image compressor to trim file sizes before uploading to a site or CMS.
- For web galleries, convert the compressed JPGs to WebP for the best load-time performance.
Edge case — large PDFs (50+ pages): Browser-based tools handle most PDFs quickly, but very large files can slow down on older devices. If you’re working with a 100-page catalog, consider splitting it into sections first using the extract PDF pages tool, then converting each section.
For more details on splitting workflows, see how to split a PDF into separate pages.
How to Optimize PDF-to-JPG Exports for Web Performance
Exporting at the right DPI is only half the job. The other half is compressing and formatting those images correctly before they go live on a website.
A 300 DPI JPG of an A4 page can easily hit 1–2 MB. That’s fine for a download, but it will significantly slow down a webpage. Here’s a practical optimization pipeline:
- Export from PDF at 150 DPI (sufficient for most web displays, including retina).
- Compress the JPG to reduce file size by 30–60% without visible quality loss. Use a tool like the image compressor or follow the guide to compressing images without quality loss.
- Convert to WebP for final web delivery. A 200 KB JPG often shrinks to 130–150 KB as a WebP, with no visible difference. Use a JPG to WebP converter to make the switch in seconds.
- Check dimensions. A 2480 x 3508 px image (standard A4 at 300 DPI) is far larger than any web thumbnail needs. Resize to the actual display dimensions before uploading. The image resizer tool handles this without quality loss.
For a full breakdown of format choices and their impact on page speed, see AVIF vs WebP vs JPEG: which format to use.
Best settings for web-ready PDF page images:
| Step | Setting | Target Output |
|---|---|---|
| DPI on export | 150 DPI | Sharp at web sizes |
| JPG quality | 75–85% | Good visual quality |
| Max dimension | 1200–1600px wide | Fits most layouts |
| Final format | WebP | 25–34% smaller than JPG |
Privacy and Security When Converting PDFs With Sensitive Content
If the PDF contains contracts, medical records, financial statements, or personal data, where the file goes during conversion matters a great deal.
Cloud-based tools that upload your file to a server pose a real risk: files can be stored, logged, or accessed by third parties, even if the service claims to delete them. SSL encryption protects the transfer, but doesn’t protect what happens to the file once it arrives.
Browser-based tools solve this cleanly. When all processing runs in your browser, the file never leaves your device. There’s nothing to intercept, no server to breach, and no retention policy to worry about.
For a clear comparison of how these two approaches differ, see browser-based file conversion vs cloud upload tools.
Checklist for secure PDF-to-JPG conversion:
- Confirm the tool runs in-browser (check the tool’s “how it works” page)
- Avoid tools that require account creation for basic conversions
- Don’t use public Wi-Fi when converting sensitive documents, even with browser-based tools
- After conversion, clear your browser’s download folder if the device is shared
- For very sensitive files, consider stripping EXIF metadata from exported images using an image EXIF remover
Common Mistakes When Converting PDF to JPG
These are the issues that come up most often, and each one has a quick fix.
1. Exporting at 72 DPI by default. Most tools default to screen resolution. Always check the DPI setting before converting. Set it to at least 150 for anything that will be displayed larger than a small icon.
2. Exporting the full PDF when only one page is needed. Use a page-range selector or split the PDF first. Exporting 40 pages when you only need page 1 wastes time and creates files you’ll need to delete.
3. Uploading oversized JPGs directly to a website. A 3 MB JPG from a PDF export will hurt page load times. Always compress and resize before uploading.
4. Using JPG for text-heavy PDF pages, JPG compression creates artifacts around sharp edges like letters and lines. Use PNG for text-heavy pages, then convert to WebP for web delivery.
5. Screenshotting a PDF to get a “better” image. Screenshots bypass DPI controls entirely. The result is device-dependent, margin-inconsistent, and usually lower quality than a proper export at 150 DPI.
Recommended PDF to JPG Tools and Settings for 2026
Here’s a practical comparison of the main options available in 2026:
| Tool | DPI Control | Batch Support | Privacy | Best For |
|---|---|---|---|---|
| CoreToolsHub PDF to Images | Yes (72–300 DPI) | Yes | In-browser, no uploads | Privacy-first, fast web exports |
| Smallpdf | Limited | Single page (free tier) | Server-based | Quick one-off conversions |
| Wondershare PDFelement | Yes (72–600 DPI) | Yes | Desktop app | High-res print exports |
| Adobe Acrobat | Yes (up to 600 DPI) | Yes | Server-based, login required | Professional workflows |
| PDF24 Tools | Limited | Yes | Server-based, auto-delete | Free, no watermarks |
Choose CoreToolsHub if privacy matters, you want fast, clean results without an account, and your output is for web use. Choose PDFelement or Acrobat if you need 600 DPI exports for print production and are comfortable with desktop installs or cloud sign-in.
For a broader look at all the PDF tools available in one place, visit the online PDF tools hub.
Frequently Asked Questions
What is the best DPI for converting PDF to JPG for a website?
150 DPI is the best starting point for web use. It produces sharp images on retina screens at typical blog or gallery sizes while keeping file sizes manageable. Use 300 DPI only if the image will be displayed very large or downloaded for print.
Why does my PDF to JPG conversion look blurry?
The most likely cause is a low DPI setting—usually 72 DPI, the default in many tools. Increase the DPI to 150 or 300 and re-export. If the original PDF contains low-resolution images, no amount of DPI adjustment will recover detail that isn’t there.
Can I convert just one page of a PDF to JPG?
Yes. Most converters include a page-range selector. Enter the specific page number you need, or use a split PDF tool to extract that page first, then convert.
Is it safe to convert a PDF with personal information using an online tool?
It depends on the tool. Browser-based converters that process files locally on your device are safe because the file never leaves your computer. Avoid tools that upload your file to a server if the PDF contains sensitive content.
Should I use JPG or PNG when exporting PDF pages?
Use JPG for pages with photos or complex graphics. Use PNG for pages with text, logos, or flat-color artwork. For web publishing, convert either format to WebP afterward for the best balance of quality and file size.
How do I convert a multi-page PDF to separate JPG images?
Use a batch converter that exports all pages at once and packages them in a ZIP file. Set a consistent DPI across all pages before converting to ensure uniform quality.
What’s the difference between extracting images from a PDF and converting pages to JPG?
Extracting images pulls out the embedded graphics (photos, charts) placed within the PDF. Converting pages to JPG renders the entire page — text, layout, and all — as a flat image. For thumbnails and previews, page conversion is usually what you want.
Will converting to WebP instead of JPG improve my website’s load time?
Yes, noticeably. WebP files are typically 25–34% smaller than equivalent JPGs at the same visual quality. For a gallery with 20 PDF page previews, that difference adds up quickly and can improve Core Web Vitals scores.
Do I need to install software to convert PDF to JPG?
No. Browser-based tools handle the conversion entirely in your browser with no installs and no signup required. They work on desktop and mobile.
Can I go back from JPG to PDF if needed?
Yes. Use an images to PDF tool to combine JPG files back into a single PDF document. Useful for reassembling pages after editing individual images.
Conclusion
Converting PDF to JPG without quality loss comes down to three decisions: the right DPI for your use case, the right format (JPG, PNG, or WebP), and the right tool for your privacy needs.
For most web workflows, 150 DPI plus a quick compression pass gives you sharp, fast-loading images without bloated file sizes. For print, go to 300–600 DPI. For anything going on a website, WebP is worth the extra conversion step.
Next steps:
- Convert your PDF pages using the PDF to Images tool — runs in your browser, no signup needed.
- Compress the exported JPGs with the image compressor to cut file sizes before uploading.
- Convert to WebP for web delivery using the JPG to WebP converter.
- If you need to prep your PDF first (reorder, split, or rotate pages), the full PDF tools suite has everything in one place.
Fast, clean results. No installs. All processing in your browser.