













Last Updated: 05/18/2026
You’ve got six photos of a signed contract, three snapshots of receipts, and a scanned ID — and the submission portal only accepts a single PDF. Sound familiar? Converting a stack of JPGs into one clean, shareable PDF is one of the most common file tasks people need to do, and most tools make it harder than it should be: watermarks, upload caps, forced sign-ups, or a final file that looks nothing like what you expected.
The JPG to PDF Converter on Core Tools Hub solves this in seconds. Drag in your images, reorder them, pick your quality, and download a clean PDF — no watermark, no account, no files leaving your device.
Key Takeaways
- Convert and combine multiple JPGs into a single PDF entirely in your browser — nothing is uploaded to any server.
- Drag and drop to reorder images visually before export, so your PDF pages land in the right sequence.
- Choose Low, Medium, or High output quality to balance file size against image sharpness.
- GPS metadata is stripped by default, protecting your privacy when sharing scanned IDs or financial documents.
- Works on desktop Chrome, Firefox, Edge, and mobile Safari — no install needed, no signup required.
What the JPG to PDF Tool Does — and Why It Beats Most Alternatives
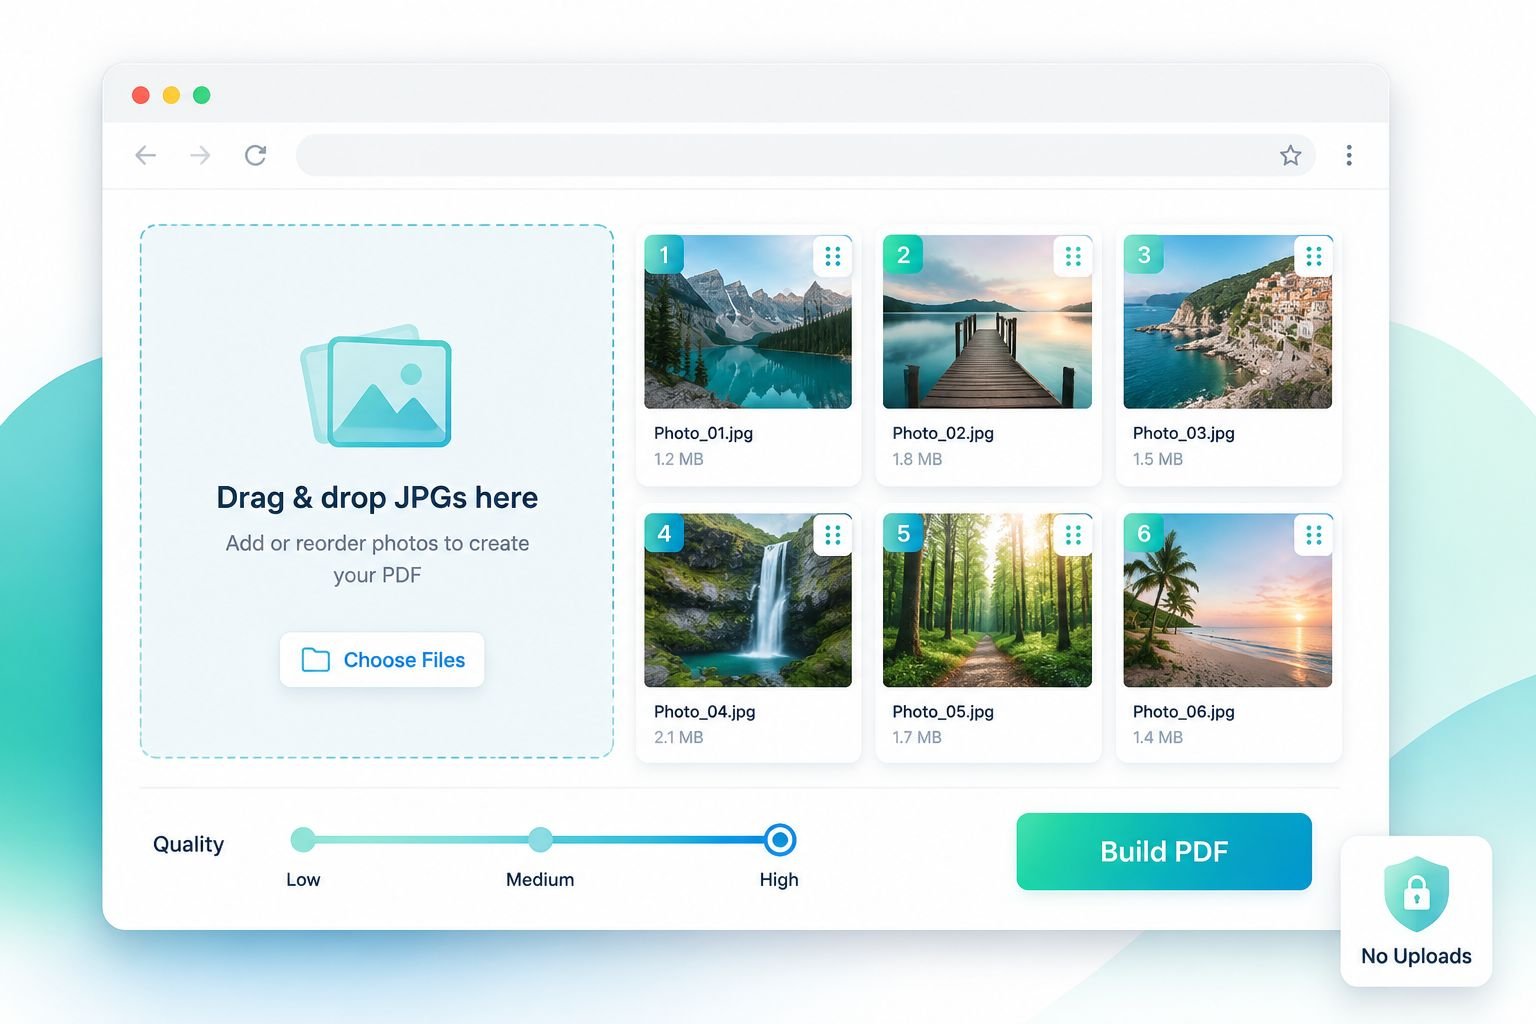
Drop your JPGs onto the big upload zone at the top of the page and thumbnails appear instantly. Each image shows a drag handle so you can reorder pages before building the PDF. That’s the core loop — and it’s fast.
Here’s what makes this tool different from the crowded field of online converters:
| Feature | Core Tools Hub | Typical Free Tool |
|---|---|---|
| Watermark on output | ❌ None | ✅ Often added |
| Sign-up required | ❌ No | ✅ Usually yes |
| Files uploaded to server | ❌ Never | ✅ Almost always |
| Reorder pages visually | ✅ Yes | ⚠️ Rare |
| Works on mobile Safari | ✅ Yes | ⚠️ Inconsistent |
| Quality slider | ✅ Low / Med / High | ⚠️ Rarely offered |
| GPS metadata stripped | ✅ On by default | ❌ Usually not |
The tool runs entirely in your browser using a JavaScript PDF engine. Your images are processed locally — the same way a desktop app would handle them — which means fast, clean results without the privacy risk of cloud uploads.
When Should You Use a JPG to PDF Converter?
This tool is the right pick when you need to:
- 📎 Email multiple scans as one attachment — Gmail and Outlook both have 25 MB attachment limits; a single PDF is easier to manage than a zip of images.
- 🏛️ Submit government or legal forms — portals for visa applications, tax documents, and court filings almost always require PDF, not JPG.
- 🧾 Combine expense receipts — finance teams and accounting apps expect one PDF per claim, not a folder of photos.
- 🎓 Package school or job application documents — combine a transcript photo, ID scan, and signed cover letter into one tidy file.
- 🖨️ Prepare print-ready documents — PDFs print predictably; JPGs can scale or crop unexpectedly depending on the printer driver.
Quick tip: If your images came from an iPhone and have a
.heicextension instead of.jpg, convert them first using the HEIC to JPG converter — then bring them back here to build your PDF.
How to Combine and Reorder JPGs Into One PDF — Step by Step
The whole process takes under two minutes. Here’s exactly what to do.
Step 1 — Open the Tool and Drop Your Images
Go to coretoolshub.com/jpg-to-pdf/. You’ll see a large drop zone above the fold. Either drag your JPG files directly onto it or click to browse your device. On mobile, tapping the zone opens your photo library or file picker.
Batch tip: You can add 20+ images at once. Thumbnails appear immediately — no waiting for uploads because nothing is being sent anywhere.
Step 2 — Reorder Your Pages
Thumbnails appear in a grid with visible drag handles. Grab any thumbnail and drag it to the correct position. This is the step most tools skip, and it matters — especially for multi-page contracts, booklets, or ordered receipts.
✅ Check your order before moving on. Page 1 in the thumbnail grid becomes page 1 of the PDF.
Step 3 — Rotate Any Images That Need It
If a photo came off your phone sideways, click the rotate button on that thumbnail. Each image rotates independently — you don’t have to fix the whole batch.
Step 4 — Set Your Quality and Page Size
This is where the Best Settings table below comes in handy:
| Use Case | Quality Setting | Why |
|---|---|---|
| Email attachment (under 10 MB) | Low or Medium | Keeps file size manageable |
| Print-ready document | High | Preserves sharp text and detail |
| Government portal upload | Medium | Balances quality with portal file limits |
| ID scan or signed form | High | Ensures text stays legible |
| Quick proof or draft | Low | Fast download, small file |
The tool shows an estimated PDF size as you move the quality slider — so you can see the tradeoff before you commit.
Page size: The default is A4, which works for most formal documents. US Letter is also available for North American submissions.
Step 5 — Check the Privacy Setting
The “Strip GPS metadata” toggle is ON by default. Leave it on. GPS data embedded in phone photos can reveal exactly where a photo was taken — not something you want attached to an ID scan or financial document.
Step 6 — Build and Download Your PDF
Click “Build PDF” (or equivalent). The PDF assembles locally in your browser. When it’s ready, click Download. The file lands in your downloads folder, clean and watermark-free.
Common mistakes to avoid:
- ❌ Forgetting to reorder thumbnails before building — there’s no undo once you download.
- ❌ Using High quality for a 20-image PDF you need to email — the file may exceed your recipient’s inbox limit.
- ❌ Uploading HEIC files directly — convert to JPG first.
- ❌ Assuming all pages are portrait — check landscape photos and rotate before building.

Privacy: Your Images Never Leave Your Browser
Most online converters work by uploading your files to a remote server, processing them there, and sending the result back. That means your images — ID cards, payslips, signed documents — pass through someone else’s infrastructure.
This tool works differently. The PDF assembly happens entirely inside your browser tab using a JavaScript-based PDF engine. No file data is transmitted to any server at any point. Close the tab and everything is gone.
This matters most when you’re working with:
- 🪪 Government-issued ID scans
- 💳 Bank statements or financial receipts
- ✍️ Signed contracts or legal forms
- 🏥 Medical documents or insurance paperwork
“All image-to-PDF assembly happens in the browser — JPGs are never uploaded, which is critical for ID scans, financial receipts, and signed documents.”
For more on how browser-based processing compares to cloud tools, see the browser-based vs cloud upload tools guide.
FAQ — JPG to PDF Quality, Page Size, Metadata, and Mobile Use
Will my images lose quality when converted to PDF?
JPG is already a compressed format (lossy compression — meaning some detail is discarded when the photo is saved). Converting to PDF wraps the JPG inside the document without adding another round of compression, unless you choose Low quality. At Medium or High, the image in the PDF looks essentially the same as the original JPG. At Low, you’ll see a smaller file but slightly softer edges — fine for drafts, not ideal for print.
What page size does the PDF use?
Default is A4 (210 × 297 mm). US Letter (8.5 × 11 in) is also available. Each image is scaled to fit the page while keeping its aspect ratio — so a wide landscape photo won’t get cropped, it’ll just have white margins on the sides.
Does the tool strip GPS and EXIF metadata?
Yes. The “Strip GPS metadata” toggle is on by default. EXIF data (short for Exchangeable Image File Format) is information embedded in photo files — it can include GPS coordinates, camera model, date, and time. Stripping it is the safer default for any document you’re sharing outside your household. If you need to preserve metadata for archival reasons, you can toggle it off.
Does it work on iPhone and Android?
Yes. The tool is mobile-friendly and tested on mobile Safari (iOS) and Chrome (Android). Tap the drop zone to open your photo library. The drag-to-reorder grid works with touch. The quality slider and download button work the same as on desktop.
How many images can I add?
The tool handles 20+ images comfortably. Very large batches (50+ high-resolution photos) may slow down older devices since all processing happens locally in the browser — your device’s RAM is the limit, not a server cap.
What if I need to combine PDFs instead of images?
If you already have separate PDFs and want to merge them, use the Merge PDF tool instead. For a mix of image types (PNG, WebP, JPG), the Images to PDF converter handles multiple formats in one go.
Related Tools to Use Next
Once your PDF is built, here’s what to do with it:
- Too large to email? Run it through the Compress PDF tool to reduce file size without obvious quality loss. For a deeper dive, see the guide to compressing PDFs for email.
- Need to combine it with other PDFs? Use the Merge PDF tool to join multiple PDF files into one.
- Working with PNG images instead of JPGs? The PNG to PDF converter follows the same workflow.
- Need to split the final PDF into separate pages? The Split PDF tool lets you extract individual pages after the fact.
- Got a PDF you need to turn back into images? The PDF to Images tool exports each page as a JPG or PNG.
Conclusion
Converting a stack of JPGs into a single, clean PDF doesn’t need to be complicated — and it definitely shouldn’t cost you a subscription or expose your documents to a third-party server. The JPG to PDF Converter on Core Tools Hub gives you drag-and-drop reordering, quality control, GPS metadata stripping, and a watermark-free download, all running privately in your browser.
Next step: Head to coretoolshub.com/jpg-to-pdf/, drop in your images, and have your PDF ready in under two minutes — no signup, no install, no surprises.