Last Updated: 07/22/2026
Every week, thousands of iPhone users hit the same wall: they try to upload a photo to a job application portal, a school form, or a Windows PC — and get an error that says the file type isn’t supported. The culprit is almost always a .heic file. Converting HEIC to JPG takes about ten seconds with the right tool, and you don’t need to install anything or hand your photos to a server.
The free HEIC to JPG converter at CoreToolsHub runs entirely inside your browser using WebAssembly. Your photos never leave your device — which matters a lot when those photos include ID cards, medical documents, or anything personal.
Key Takeaways
- 📱 HEIC is the default photo format on iPhones running iOS 11 and later — but most Windows PCs, Android phones, and web upload forms don’t natively support it.
- ⚡ You can convert HEIC to JPG, PNG, or PDF in seconds, directly in your browser — no install, no signup, no server upload.
- 🔒 Because decoding runs in WebAssembly locally, your photos and their metadata (including GPS data) never leave your device.
- 📦 Bulk upload 25+ HEIC files at once and download them as a ZIP — useful when moving a full camera roll to Windows.
- 🎛️ Use the EXIF toggle to keep or strip photo metadata before you share.
What Is HEIC and Why Won’t It Open?
HEIC stands for High Efficiency Image Container. Apple made it the default format starting with iOS 11 because it stores photos at roughly half the file size of JPG with similar or better visual quality. That’s great for iPhone storage — less great for everyone else.
The problem is compatibility. Firefox has had an open ticket for native HEIC support since 2017, and still doesn’t render it. Windows requires a paid HEIF extension from the Microsoft Store to open HEIC files in Photos or Paint (and even then, results are inconsistent). Android devices running recent iOS 18 HEIC files have reported compatibility failures in developer communities as recently as mid-2026.
The quickest fix: convert HEIC to JPG before sharing, uploading, or printing. JPG works everywhere.
HEIC vs JPG vs PNG vs PDF: Which Output Should You Choose?
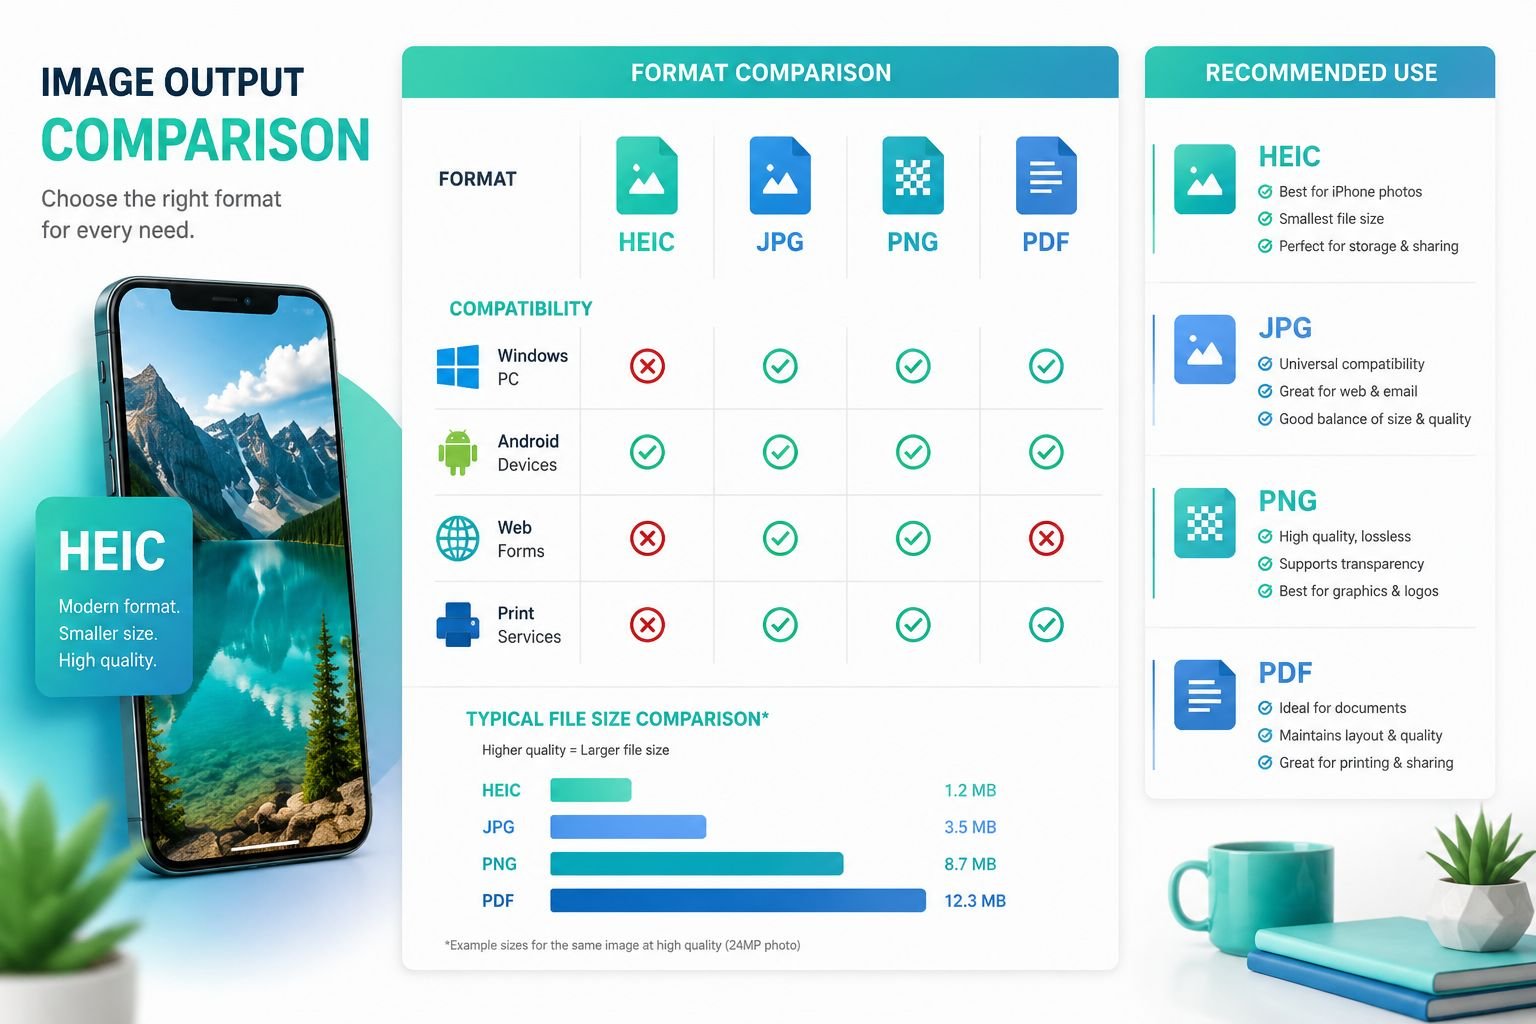
Not every conversion job needs the same output. Here’s a plain-English breakdown:
| Output | Best For | File Size | Quality Notes |
|---|---|---|---|
| JPG | Email, web uploads, printing, sharing | Small | Lossy compression — minor quality loss at high compression |
| PNG | Screenshots, graphics with text, transparent backgrounds | Larger | Lossless — no quality loss, but bigger files |
| Submitting photos as documents, multi-page reports | Medium | Embeds image as-is; great for forms and job applications |
Choose JPG for almost everything: social media, email attachments, photo printing services, and web form uploads. It’s the most universally accepted format and keeps file sizes manageable. If you need to reduce file size further after converting, a quick compression pass will get it under most email limits.
Choose PNG when converting a screenshot or an image with sharp text and logos. PNG uses lossless compression, so edges stay crisp. The tradeoff is a larger file. For a deeper look at when lossless matters, see our guide on lossless vs lossy formats and when each makes sense.
Choose PDF when a form or employer asks you to submit a photo as a document. The Images to PDF tool can bundle multiple converted photos into a single file.
Best Settings for HEIC to JPG Conversion
| Setting | Recommended Value | Why |
|---|---|---|
| JPG Quality | 85–90% | Sharp results, ~60% smaller than PNG |
| EXIF Data | Keep (unless sharing publicly) | Preserves date, camera info |
| Strip GPS | On (for public sharing) | Removes location from metadata |
| Output | JPG for photos, PNG for screenshots | Match format to content type |
Quick tip: If you’re uploading to a job portal or government form, JPG at 85% quality is almost always the right call. It’s small enough to pass file-size limits and clear enough to read.
How to Convert HEIC to JPG on Windows, Mac, iPhone, and Android
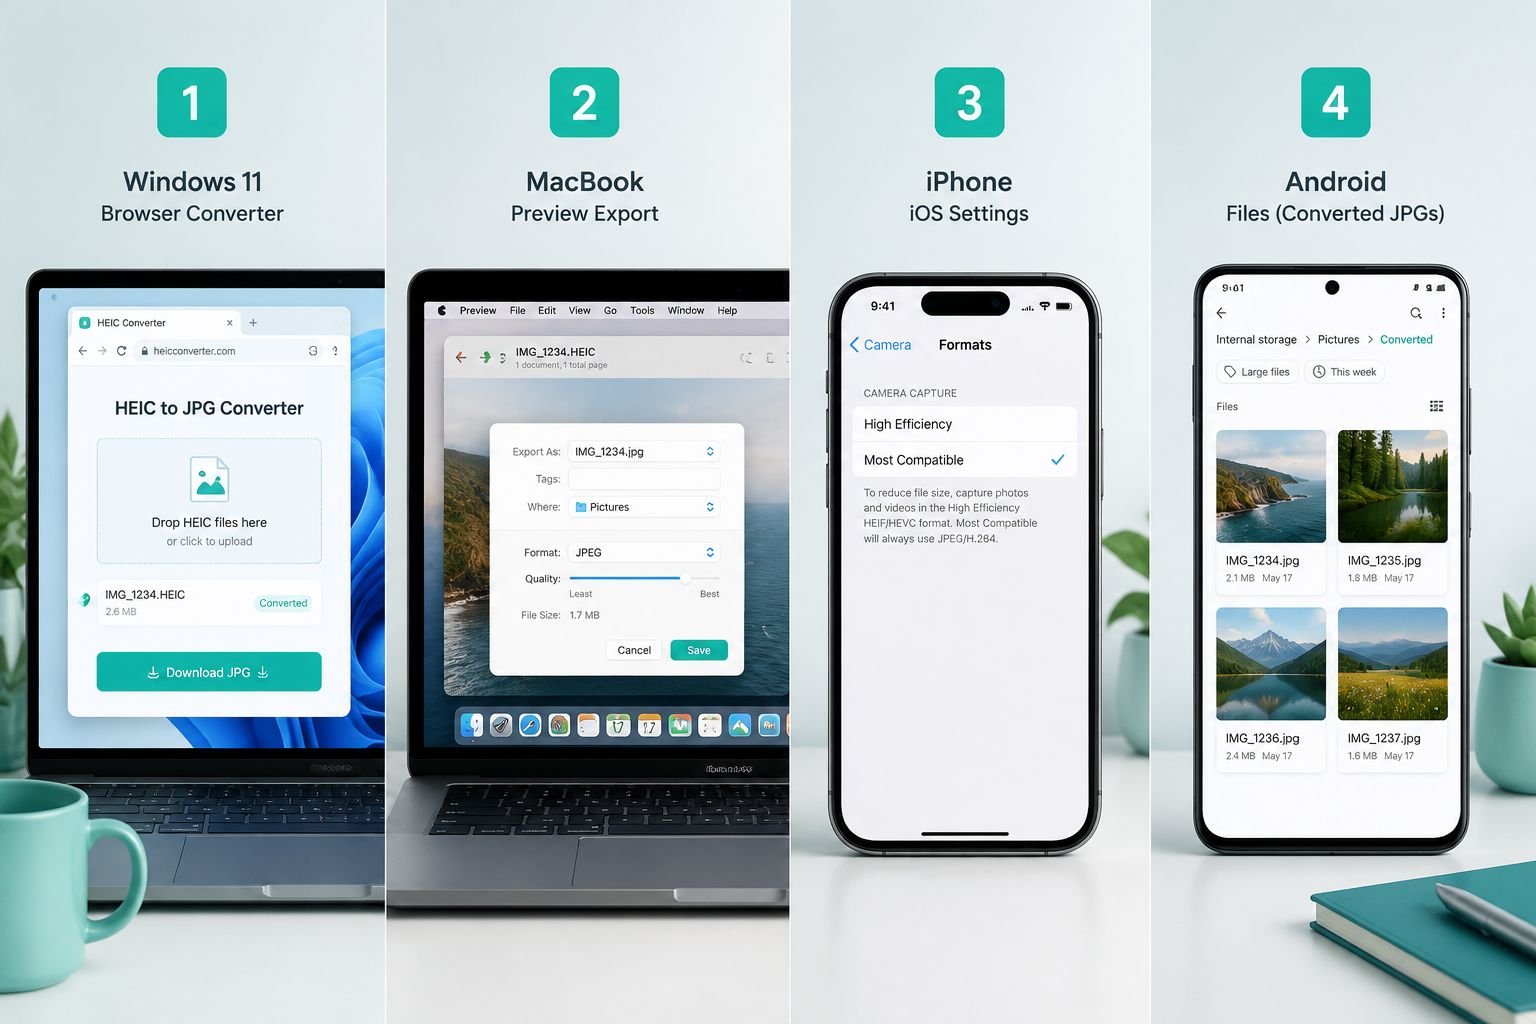
Option 1: Use the Browser-Based Converter (Any Device)
This is the fastest method on any platform — no software install, no account, works on desktop and mobile.
- Go to the HEIC to JPG Converter.
- Click Upload or drag and drop your HEIC files. You can upload 25+ files at once for batch processing.
- Choose your output format: JPG, PNG, or PDF.
- Set your quality level (85% is a solid default for JPG).
- Toggle Strip GPS on if you’re sharing photos publicly.
- Click Convert — processing runs in your browser in parallel.
- Download individual files or grab the full ZIP for bulk results.
That’s it. Fast, clean results in seconds.
Option 2: Mac — Use Preview (Free, Built-In)
Mac Preview handles single-file HEIC to JPG export natively:
- Open the HEIC file in Preview.
- Go to File → Export.
- Choose JPEG from the Format dropdown.
- Adjust quality with the slider, then save.
This works well for one or two files. For 10+ files, the browser tool or a command-line option is faster.
Command-line batch option (Mac/Windows/Linux): If you’re comfortable with a terminal, ImageMagick handles large batches cleanly:
<code>magick mogrify -format jpg *.heic
</code>
This preserves EXIF data by default and processes entire folders at once.
Option 3: Windows — Fix the Compatibility Gap
Windows doesn’t open HEIC files natively without the Microsoft Store’s HEIF Image Extensions (free or paid tier). Even with it installed, behavior varies across Windows 10 and 11 builds.
Easiest Windows fix: Use the browser-based converter above — no extension needed, no install, works in Chrome or Edge.
Alternative: The free iMazing desktop app handles large batches (2,000+ files) at high speed without uploading anything. It’s a good choice if you’re migrating an entire iPhone library to a Windows PC.
Option 4: iPhone — Stop Creating HEIC Files
If you want photos to always save as JPG from the start:
- Open Settings → Camera → Formats.
- Tap Most Compatible.
From that point on, your iPhone saves photos as JPG. You lose a small amount of storage efficiency, but you eliminate compatibility headaches entirely. This was highlighted in a widely-watched tutorial in mid-2026 and remains the cleanest long-term fix for users who frequently share photos with non-Apple recipients.
Option 5: Android
Android doesn’t open HEIC files natively. If someone sends you a HEIC photo on Android, open the HEIC converter in Chrome on your phone, upload the file, and download the JPG. The tool is fully mobile-friendly — no desktop required.
Common Mistakes to Avoid
- ❌ Uploading to a random converter without checking privacy terms — many free tools upload files to servers and retain them. Our tool processes everything locally.
- ❌ Converting to PNG when JPG is fine — PNG files are 2–3× larger than JPG for photos. Use PNG only for screenshots and graphics.
- ❌ Forgetting to strip GPS before sharing publicly — HEIC and JPG files can carry precise location data in EXIF metadata. Use the Strip GPS toggle before posting photos online.
- ❌ Expecting perfect results from very dark or HDR HEIC files — HEIC supports HDR and wide color (P3). Some of that color range compresses when converting to standard JPG. Results are still excellent for most uses.
Why HEIC Is Private — and Why Our Converter Keeps It That Way
HEIC files often contain more than just a photo. The EXIF metadata embedded in each file can include:
- 📍 GPS coordinates (exact location where the photo was taken)
- 📅 Date and time
- 📷 Camera model and settings
- 👤 Sometimes device serial numbers
When you upload photos to a cloud-based converter, that metadata goes with them. If the service retains files — even temporarily — your location history and device info are sitting on someone else’s server.
The CoreToolsHub HEIC converter uses WebAssembly to decode HEIC files directly inside your browser tab. Nothing is transmitted. Your photos, GPS data, and EXIF information stay on your device from start to finish. This is especially important for photos of ID documents, medical paperwork, or anything taken at a private address.
If you want to go further and scrub metadata from any image format after converting, the Image EXIF Remover handles that in one click.
For a broader look at why browser-based processing is safer than cloud upload tools, see our comparison of browser-based file conversion vs cloud upload tools.
What to Try Next
Once your HEIC files are converted, here are a few common next steps:
- Resize for a web form or email → Image Resizer — set exact pixel dimensions or reduce file size for email limits.
- Need a JPG as a PDF document? → Images to PDF — combine multiple photos into one clean, print-ready PDF.
- Want to understand the full HEIC format? → What Is HEIC? How to Open & Convert HEIC Files — a plain-English explainer covering format history, device support, and conversion options.
- Converting other formats? → JPG to PNG and WebP to JPG are also available — same privacy-first, no-upload approach.
Conclusion
HEIC is a smart format for iPhone storage, but it creates real friction the moment you try to share, upload, or print photos outside the Apple ecosystem. The fix is straightforward: convert HEIC to JPG using a tool that runs in your browser, keeps your photos private, and delivers clean output in seconds.
Ready to convert? Head to the free HEIC to JPG converter, drop in your files, and download your JPGs — no signup, no install, no server upload. Bulk batches, EXIF control, and GPS stripping are all included.