Last updated: June 5, 2026
Quick Answer
An HD photo converter increases the pixel dimensions of a low-resolution image to meet the requirements of print shops, retina screens, or marketplace listings. The best results come from AI-powered upscaling that adds plausible detail rather than simply stretching pixels. For print, target 300 DPI at the final size; for high-res screens, multiply the display dimensions by the device pixel ratio (2x or 3x).
Key Takeaways
- 300 DPI is the standard for sharp photo prints. Anything below 150 DPI will look noticeably soft.
- AI upscaling can reliably double or quadruple pixel dimensions. Beyond 4x, quality depends heavily on the source image and the tool.
- The “Hallucinated” detail is the biggest risk: AI may invent textures that look sharp but aren’t real, leading to print rejections.
- DPI is a print concept. Screens care about pixel dimensions and density ratios (1x, 2x, 3x).
- Converting upscaled HD images to WebP or AVIF can reduce file size by 25–34% compared to JPEG, keeping pages fast without visible quality loss.
- Browser-based tools that process locally keep files private, with no cloud uploads and no signup required.
- Always upscale before compressing. Compressing first destroys the detail AI needs to work with.
- Marketplace platforms (Etsy, Amazon, Shutterstock) typically require minimum pixel dimensions, not DPI metadata.
When Do You Actually Need an HD Photo Converter?
A 640×480 phone photo from 2012 won’t print well on an 8×10 canvas. That’s the core problem an HD photo converter solves: it adds enough pixels so the image meets a size or resolution threshold.
You need upscaling when:
- A print shop flags your file as “low resolution” (usually under 300 DPI at the ordered print size)
- An e-commerce platform rejects your product photo for being below the minimum pixel dimensions (often 1000px or 2000px on the longest side)
- You’re preparing assets for a retina or 4K display, and your source images are 1x resolution
- You’re cropping heavily, and the remaining area doesn’t have enough pixels
You probably don’t need it when:
- Your image already meets the pixel requirements (check dimensions before upscaling)
- You’re displaying at web resolution on standard screens (72–96 PPI)
- The source is a screenshot or text-heavy graphic (upscaling won’t improve these meaningfully; re-export from the source instead)
If your image is already large enough but just needs to be resized to exact dimensions, an image resizer is the right tool, not an upscaler.
How Do Pixels, DPI, and Resolution Actually Work?
Here’s the short version: pixels are the image’s actual data, and DPI (dots per inch) determines how densely those pixels are packed on paper or a screen.
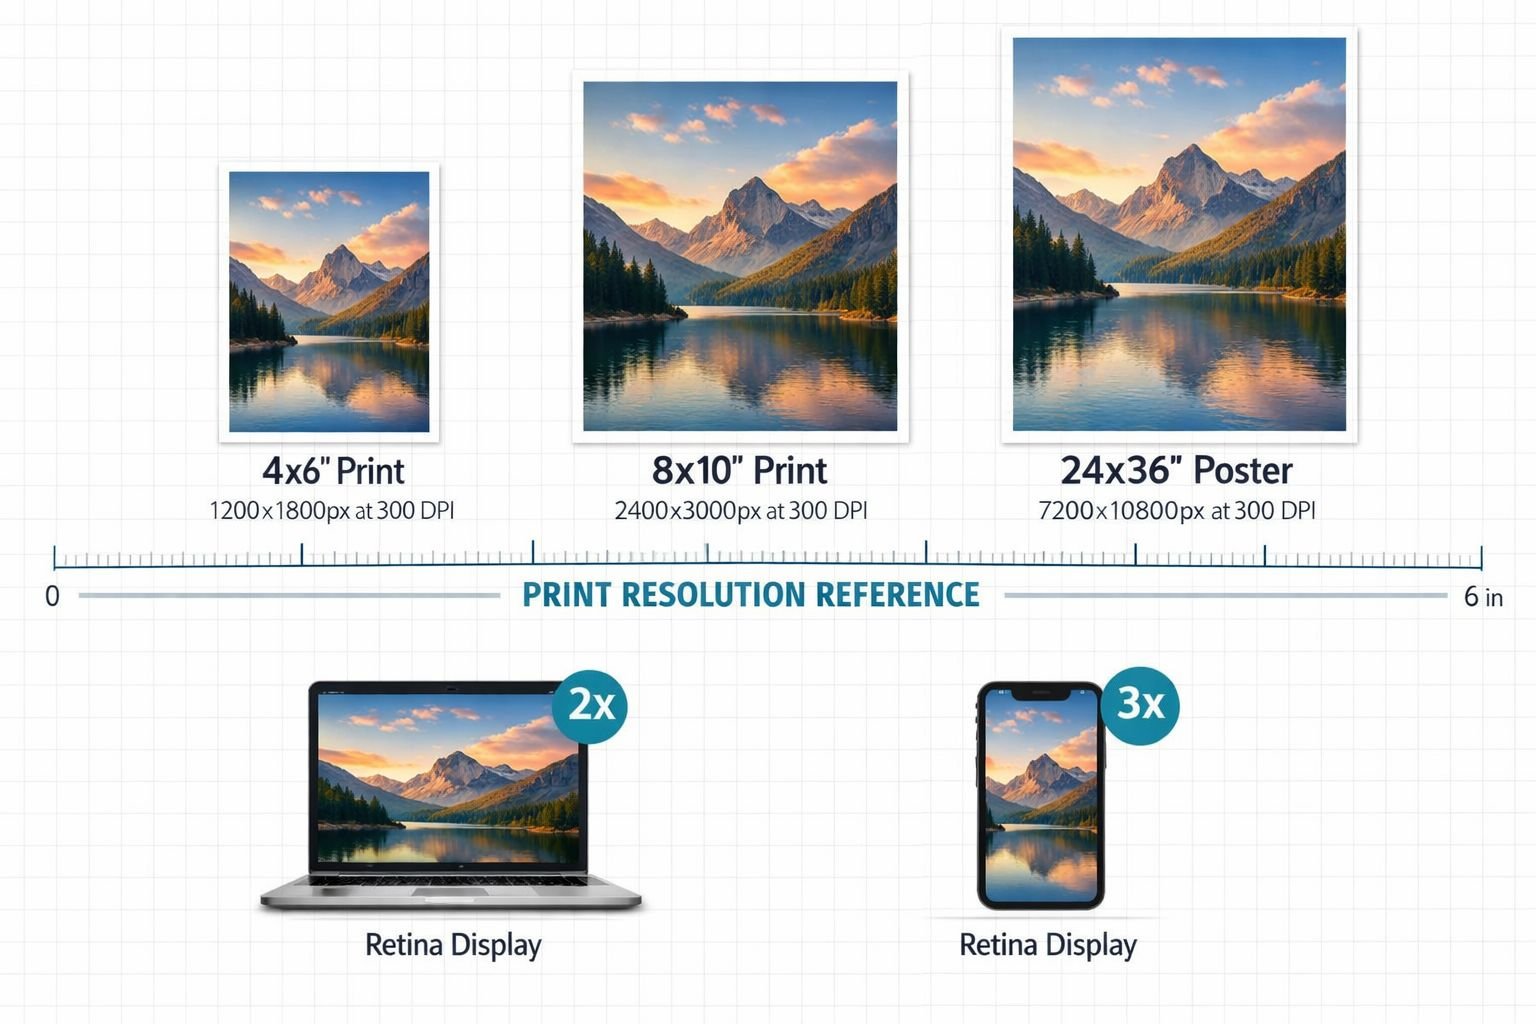
A 3000×2000 pixel image printed at 300 DPI produces a 10×6.67 inch print. The same image at 150 DPI produces a 20×13.3 inch print, but it’ll look softer because each inch has fewer dots of detail.
Print Resolution Quick Reference
| Print Size | Pixels Needed (300 DPI) | Pixels Needed (150 DPI, acceptable) |
|---|---|---|
| 4×6 in | 1200 × 1800 | 600 × 900 |
| 8×10 in | 2400 × 3000 | 1200 × 1500 |
| 11×14 in | 3300 × 4200 | 1650 × 2100 |
| 16×20 in | 4800 × 6000 | 2400 × 3000 |
| 24×36 in (poster) | 7200 × 10800 | 3600 × 5400 |
For screens, DPI metadata doesn’t matter. What matters is pixel count relative to the display’s pixel density:
- Standard (1x) display: Serve the exact pixel dimensions of the container
- Retina/2x display (most phones, MacBooks): Serve 2× the container dimensions
- 3x display (flagship phones): Serve 3× the container dimensions
So a 500px-wide product image on a 2x retina screen needs a 1000px-wide source file to look crisp. If you only have 500px, an HD photo converter can bridge that gap.
Common Mistake: Confusing DPI Metadata with Actual Resolution
Changing the DPI tag in an image’s metadata from 72 to 300 does not add pixels. It just changes how software interprets the existing pixels for print. If a print shop asks for “300 DPI,” they mean 300 DPI at the final print size, which translates to a specific pixel count. Always check pixel dimensions first.
How to Use AI Upscaling Without Creating “Fake” Details
AI upscaling tools use neural networks trained on millions of images to predict what higher-resolution detail should look like. The results can be impressive, but there’s an important distinction: genuine detail recovery vs. hallucinated detail.
What “Hallucinated” Detail Means
When AI adds texture, patterns, or facial features that weren’t in the original image, that’s hallucination. It might look convincing on screen, but can cause problems:
- Print-on-demand platforms may reject images where AI-generated artifacts are visible
- Product photos with invented textures misrepresent the actual item
- Portraits may show altered facial features
Best Practices for Reliable Upscaling
- Start with the best source you have. Even a slightly larger original will produce better results than a tiny thumbnail.
- Stick to 2×–4× upscaling for photographs. Most tools deliver clean results at these levels. Going to 8× or 16× works for some images but introduces more risk of artifacts.
- Use “faithful” mode, not “creative” mode. Tools like Topaz Gigapixel AI and Let’s Enhance offer modes that prioritize accuracy over artistic embellishment. Choose these for product photos, documents, and portraits.
- Inspect at 100% zoom. Always check the upscaled result at actual pixels. It may look great as a thumbnail, but shows smearing or invented patterns when zoomed in.
- Sharpen after upscaling, not before. Sharpening a low-res image first amplifies noise, which the AI then tries to upscale.
HD Photo Converter Tools Compared (2026)
| Tool | Max Upscale | Processing | Price | Best For |
|---|---|---|---|---|
| Topaz Gigapixel AI | 16× | Local (GPU) | $99/year | Print professionals, privacy |
| Upscayl | 16× | Local (open-source) | Free | Budget-conscious, privacy-first |
| Magnific AI | 16× | Cloud | $39/month | Creative/AI art upscaling |
| Let’s Enhance | 16× | Cloud | $12/month | E-commerce, real estate |
| Adobe Photoshop (Generative) | 4× | Local + cloud | $22.99/month | Designers already in Adobe |
| Canva | 4× | Cloud | Free / $15/month Pro | Casual users |
Choose local processing (Topaz, Upscayl) if privacy matters or you’re working with client photos. Cloud tools send your images to external servers.
How to Optimize HD Images for Web Performance and SEO
Upscaling solves the resolution problem but creates a new one: large file sizes. A 4000×3000 pixel JPEG can easily weigh 5–10 MB, which kills page load speed and hurts search rankings.
The Upscale-Then-Compress Workflow
- Upscale the image to the required pixel dimensions
- Convert to a modern format like WebP or AVIF, which deliver 25–34% smaller files than JPEG at equivalent visual quality
- Compress to hit your target file size without visible quality loss
- Serve responsive sizes so mobile devices don’t download the full 4K version
For step 2, you can convert PNG to WebP or use an AVIF converter directly in your browser, with no installs and no signup required. Both formats are supported by all major browsers in 2026.
For step 3, the image compressor at Core Tools Hub runs entirely in your browser and lets you compress without visible quality loss while watching the file size drop in real time.
Best Settings for HD Web Images
| Use Case | Format | Quality Setting | Target File Size |
|---|---|---|---|
| E-commerce product photo | WebP | 80–85% | 100–300 KB |
| Blog hero image (1200px wide) | WebP or AVIF | 75–80% | 80–200 KB |
| Portfolio/gallery (full-res) | AVIF | 80% | 200–500 KB |
| Social media share image | JPEG or WebP | 80% | 100–250 KB |
For a deeper comparison of format tradeoffs, see the AVIF vs WebP vs JPEG breakdown.
Common Mistake: Uploading Uncompressed Upscaled Files
After running an image through an HD photo converter, many users upload the raw output directly to their website or listing. This often means a 5+ MB file that loads slowly and may even get auto-compressed by the platform (with worse quality than if you’d done it yourself). Always compress before uploading.
How to Protect Privacy When Uploading Photos for Upscaling

Cloud-based upscaling tools require you to upload your images to someone else’s server. For personal photos, client work, or sensitive documents, that’s a legitimate concern.
Privacy Risks with Cloud Upscalers
- Data retention: Some services store uploaded images for model training or “quality improvement” unless you opt out
- EXIF metadata exposure: Photos often contain GPS coordinates, camera details, and timestamps that travel with the file
- Terms of service: Read carefully. Some free tools grant themselves broad usage rights to uploaded content
Privacy-First Alternatives
Browser-based tools that process files locally are the safest option for sensitive images. All processing happens on your device, so your files never leave your computer.
- Core Tools Hub’s image tools handle resizing, compression, and format conversion entirely in your browser, with no uploads to any server
- Upscayl (open-source desktop app) runs AI upscaling locally on your GPU
- Topaz Gigapixel AI processes everything on your local machine
Before using any upscaler, strip location data and other metadata with an EXIF remover. This takes seconds and removes GPS coordinates, device info, and timestamps that you probably don’t want shared.
Decision rule: If the image contains faces, location-sensitive content, or belongs to a client, use a local or browser-based tool. For generic stock-style images, cloud tools are generally fine.
Recommended HD Photo Converter Workflows for 2026
Different end goals require different workflows. Here are the most common scenarios with step-by-step instructions.
Workflow 1: Prepare a Low-Res Photo for Print
Goal: Turn a 1200×800 image into a sharp 8×10 inch print.
- Calculate required pixels: 8×10 at 300 DPI = 2400×3000 pixels
- Upscale using an HD photo converter at approximately 2.5–3× (choose a “faithful” or “standard” mode)
- Crop to an exact 8:10 ratio if needed using an image resizer
- Save as TIFF or high-quality JPEG (95%+) for the print shop
- Verify: open the file, check pixel dimensions, and inspect at 100% zoom for artifacts
Workflow 2: Fix Low-Resolution Warnings on E-Commerce Platforms
Goal: Meet a 2000px minimum for Amazon or Etsy product listings.
- Check your current image dimensions (right-click > Properties on Windows, Get Info on Mac)
- If under 2000px on the longest side, upscale to 2500–3000px (gives you cropping room)
- Compress to WebP or JPEG at 80–85% quality to keep the file under 500 KB
- Upload and verify that the platform accepts it without warnings
Workflow 3: Create Retina-Ready Images for a Website
Goal: Serve crisp images on 2x and 3x screens without bloating page load.
- Determine the CSS display size (e.g., 600px wide)
- Upscale or export your source at 1200px wide (2×) or 1800px (3×)
- Convert to WebP using a PNG to WebP converter or JPG to WebP converter for fast, clean results
- Use
srcsetin HTML to serve the right size to each device - Compress to keep each variant under 200 KB
Workflow 4: Convert iPhone HEIC Photos to HD Print-Ready Files
iPhone photos in HEIC format are high quality but many print services don’t accept HEIC. Convert them first using a HEIC to JPG converter, then upscale if the pixel count falls short of your print size requirements.
Common Mistakes When Using an HD Photo Converter
Upscaling screenshots or text. AI upscalers are trained on photographs. Screenshots, charts, and text-heavy images often come out blurry or distorted. Re-export from the source application instead.
Over-upscaling. Pushing a 200×200 thumbnail to 4000×4000 (20×) will produce visible artifacts no matter the tool. Stay within 2–4× for reliable results.
Ignoring the source format. Starting from a heavily compressed JPEG (quality 30%) means the AI has very little real detail to work with. If a better source exists, always use it.
Skipping the compression step. Upscaled images are large. Forgetting to compress before uploading wastes bandwidth and slows load times.
Trusting DPI metadata alone. As covered above, changing the DPI without changing the pixel count does nothing to improve actual print quality.
Using “creative” mode for product photos. Creative upscaling modes add artistic detail that looks great for illustrations but can misrepresent real products.
Conclusion
An HD photo converter bridges the gap between what you have and what print shops, e-commerce platforms, and high-res screens demand. The key is understanding that upscaling works best at moderate ratios (2–4×), that DPI is just a mathematical relationship between pixels and physical size, and that AI-generated detail should be inspected carefully before going to print.
Your action plan:
- Check your image’s current pixel dimensions against your target size
- Upscale using a reliable tool in faithful/standard mode
- Inspect at 100% zoom for artifacts
- Compress and convert to a modern format for web, or save as high-quality JPEG/TIFF for print
- Strip metadata if privacy matters
For the compression, format conversion, and resizing steps, Core Tools Hub’s image tools handle everything in your browser: privacy-first, no installs, no signup required. Pair them with a local upscaler like Upscayl or Topaz for a complete HD photo workflow that keeps your files private and your output sharp.
FAQ
What does an HD photo converter actually do? It increases an image’s pixel dimensions using AI algorithms that predict and fill in details, producing a higher-resolution version suitable for print or high-density screens.
Can I convert a blurry photo to HD? Partially. AI can sharpen mild blur and add plausible detail, but it can’t recover information that was never captured. Severely blurry images will improve somewhat but won’t match a natively sharp photo.
What DPI do I need for printing photos? 300 DPI at the final print size is the standard for sharp results. 150 DPI is acceptable for large prints viewed from a distance (posters, banners). Below 150 DPI, most people will notice softness.
Is upscaling the same as increasing DPI? No. Upscaling adds actual pixels. Changing DPI metadata just tells software how to map existing pixels to physical inches. You need more pixels, not just a higher DPI number.
How much can I upscale a photo before it looks bad? 2–4× is reliable for most photos with current AI tools. Beyond 4×, results depend on the source quality and the tool. 8–16× is possible but inspect carefully for artifacts.
Do browser-based HD photo converters keep my files private? Tools that process in the browser (like Core Tools Hub) never upload your files to a server. Cloud-based upscalers do upload files, so check their privacy policy before using them with sensitive images.
What’s the best format for upscaled images on the web? WebP or AVIF. Both deliver 25–34% smaller file sizes than JPEG while maintaining similar visual quality, which matters even more when serving high-resolution images.
Why did my print shop reject my upscaled image? Common reasons: the pixel count still doesn’t meet their minimum at the ordered size, visible AI artifacts in the image, or the DPI metadata was changed without actually adding pixels.
Should I sharpen before or after upscaling? After. Sharpening a low-res image first amplifies noise and compression artifacts, which the upscaler then tries to enlarge.
Can I upscale and compress in one step? These are separate processes. Upscale first to get the pixels you need, then compress to reduce file size. Doing them together or in reverse order produces worse results.
What’s the difference between an HD photo converter and an image enhancer? An HD photo converter focuses on increasing resolution (pixel count). An image enhancer adjusts brightness, contrast, color, and sharpness without necessarily changing dimensions. Many tools do both, but the goals are different.